
Content:
- 1960’s Jedson bass
- 1970’s Morris electric
- 1908 Gibson A Mandolin
- 1960’s Burns Bison Bass
- Runesson acoustic
- 1976 Gibson Gospel
- 1977 Musicman Stingray fingerboard replacement
- Upgrading a “craft made” Gypsy guitar
- Replacing a pin bridge on a Martin acoustic
- Fan fret bridge change
- Godin Multiac with broken headstock
- Broken headstock 1970s Guild acoustic
- Upgrading a cheap travel guitar
- 1950’s James T Coppock Antoria restoration
- 1970’s Suzuki restoration
- Compensated nuts
- Hofner President Bass restoration
- Very old Violin repair
- Mandolin bridge repair
- Thompson 6 string bass bridge
- Parker Night fly refret and refurbishment
- Thompson 5 string acoustic bass project
- Badly done wiring
- Thompson 4 string fretted acoustic bass project
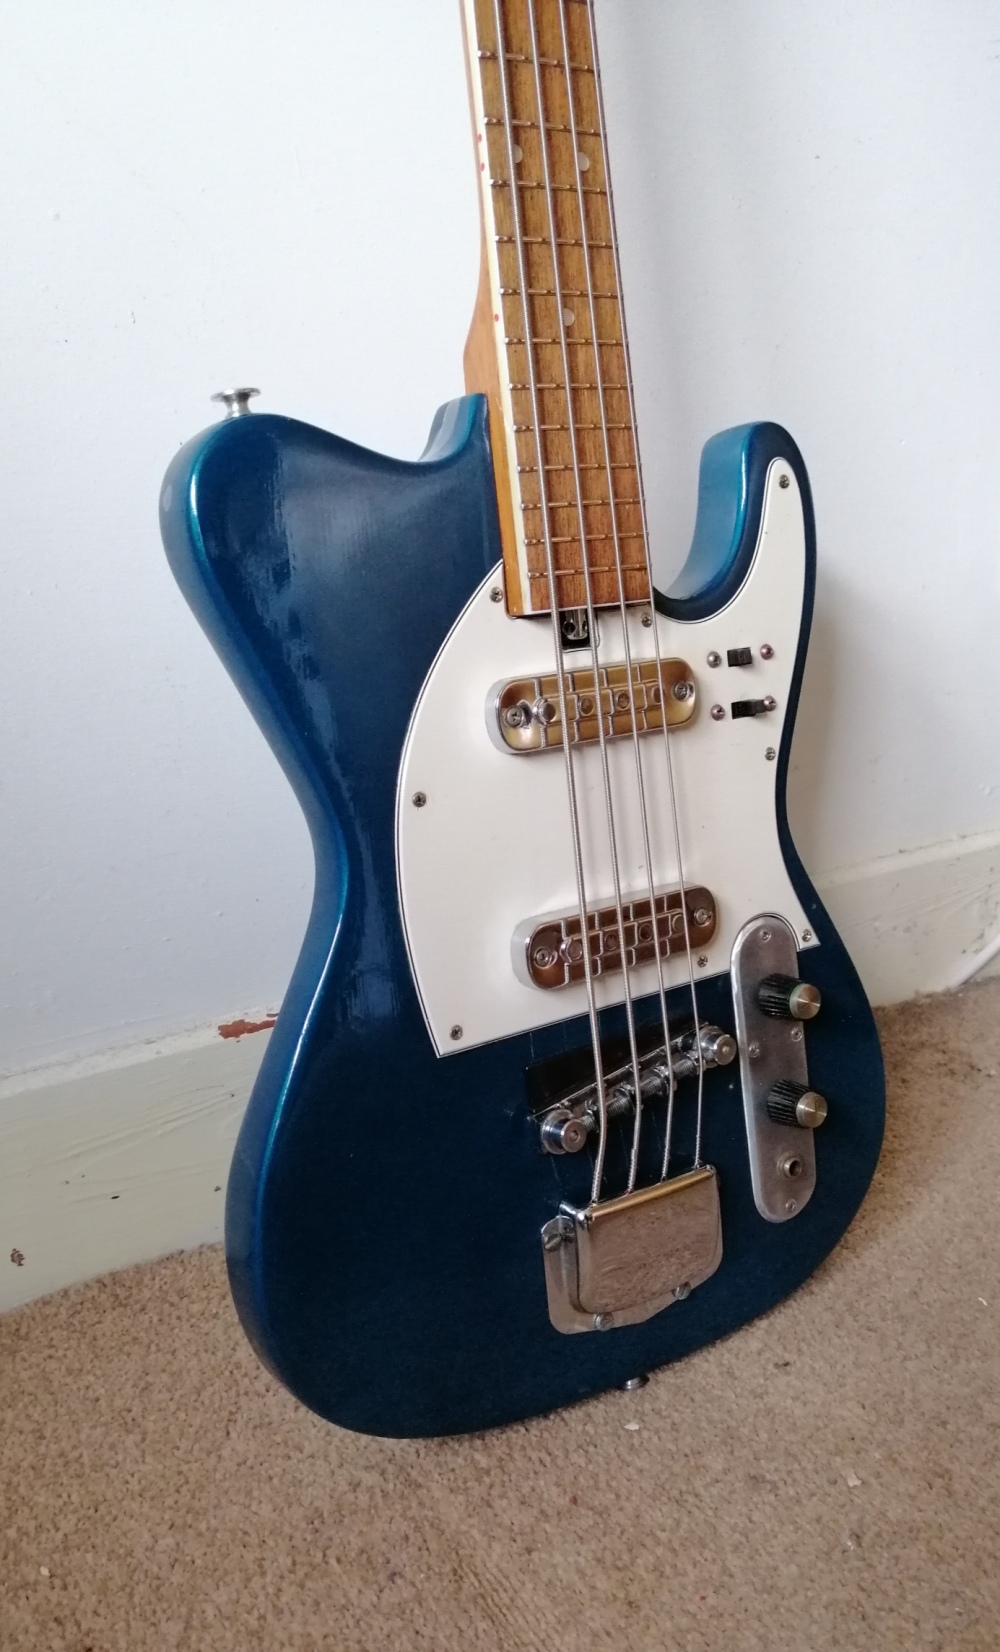
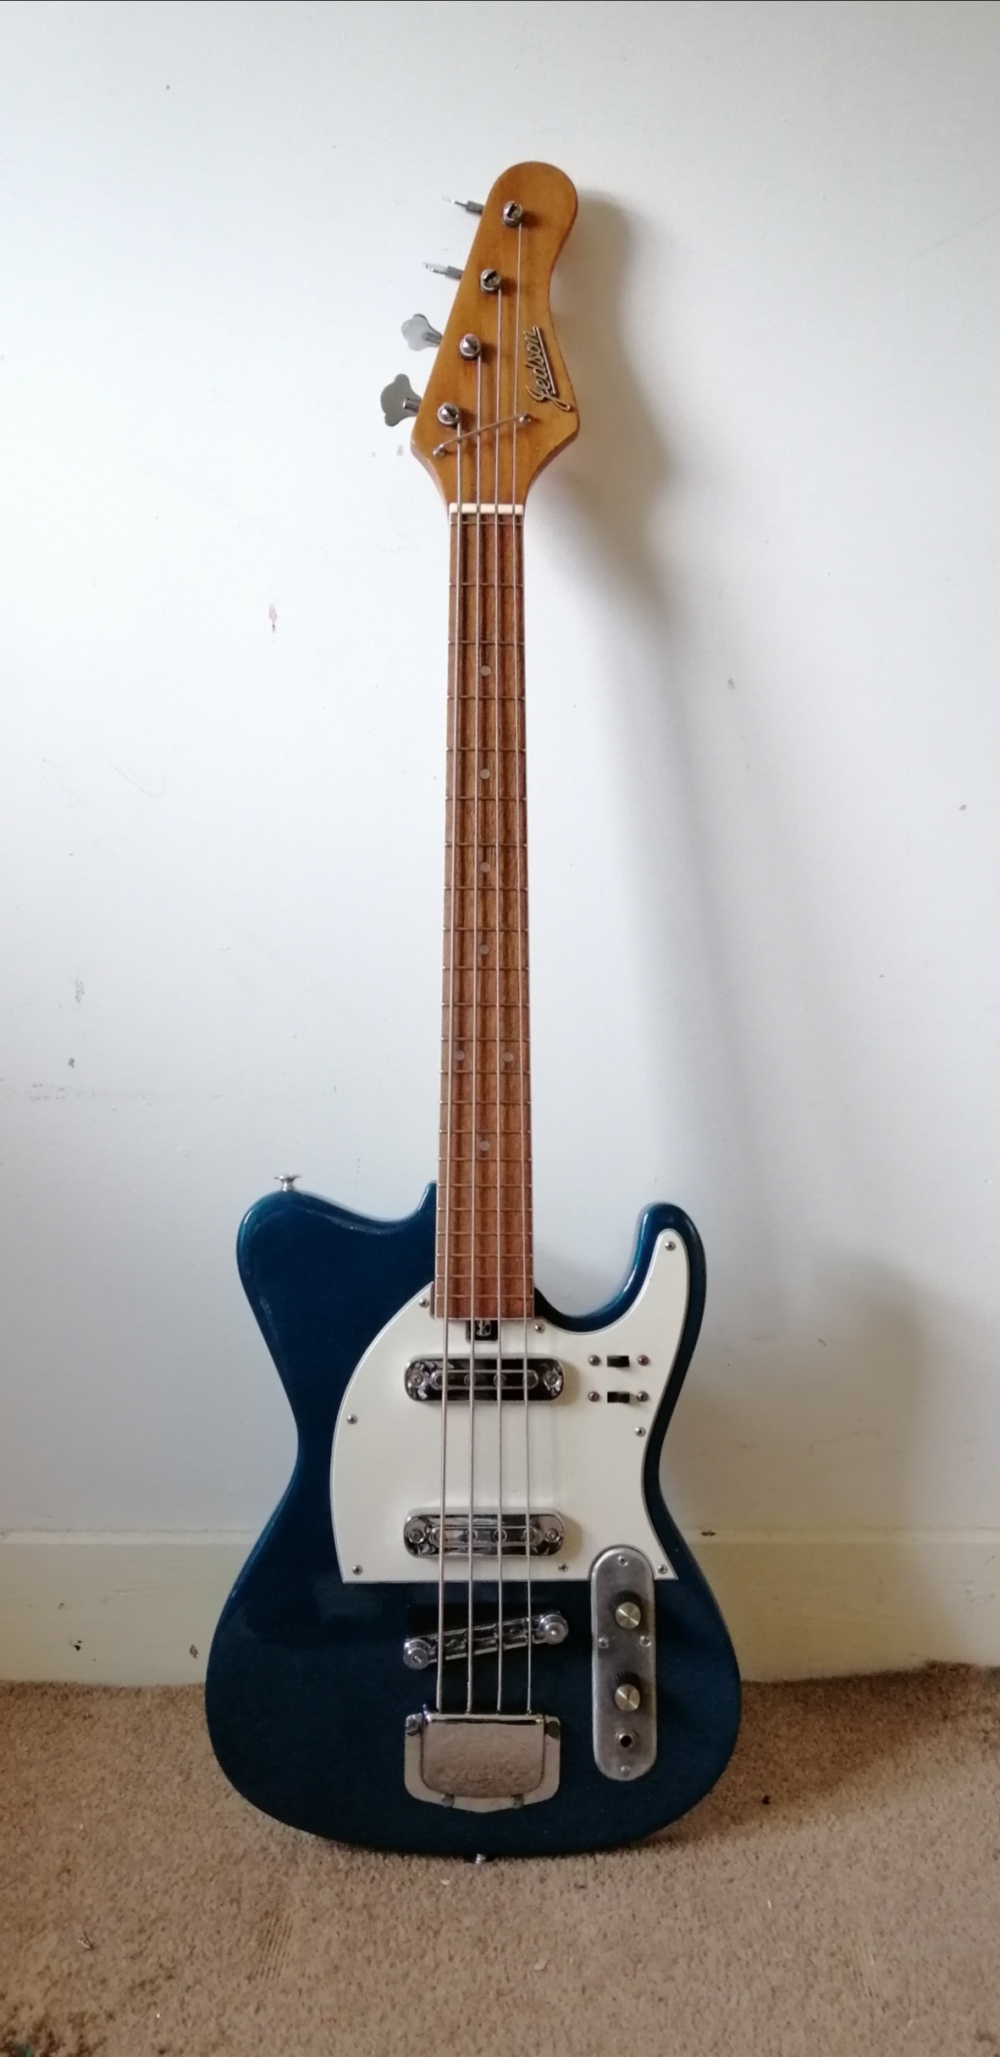
1960’s Jedson bass
This is an interesting one as well. A very short scale Jedson bass from the 1960’s. It was refinished some time ago but the paint is quite good and all else is original. This comes from the time of big competition in the retail market and while some makers moved on to the relatively new electric bass, as a separate model to the guitar, many manufacturers were not prepared to invest in dedicated tooling for this other instrument. The solution for some was to take a guitar from their existing line up, drill 4 holes in the headstock (as opposed to 6) and modify the guitar pickups for 4 pole pieces. The bridge again was a converted guitar item. The string holder part of the bridge was easily adapted too. What they presented was a 24.5″ scale electric bass. The idea that this was made so guitarists could play bass too has some merit but I believe it was more about economics.

The odd thing in all this was the tuners. the maker clearly wasn’t going to purchase the required quantity from an established manufacturer so they came up with these. They look like mini Fender tuners but actually they are over engineered with a metal sleeve bearing to carry the string post.
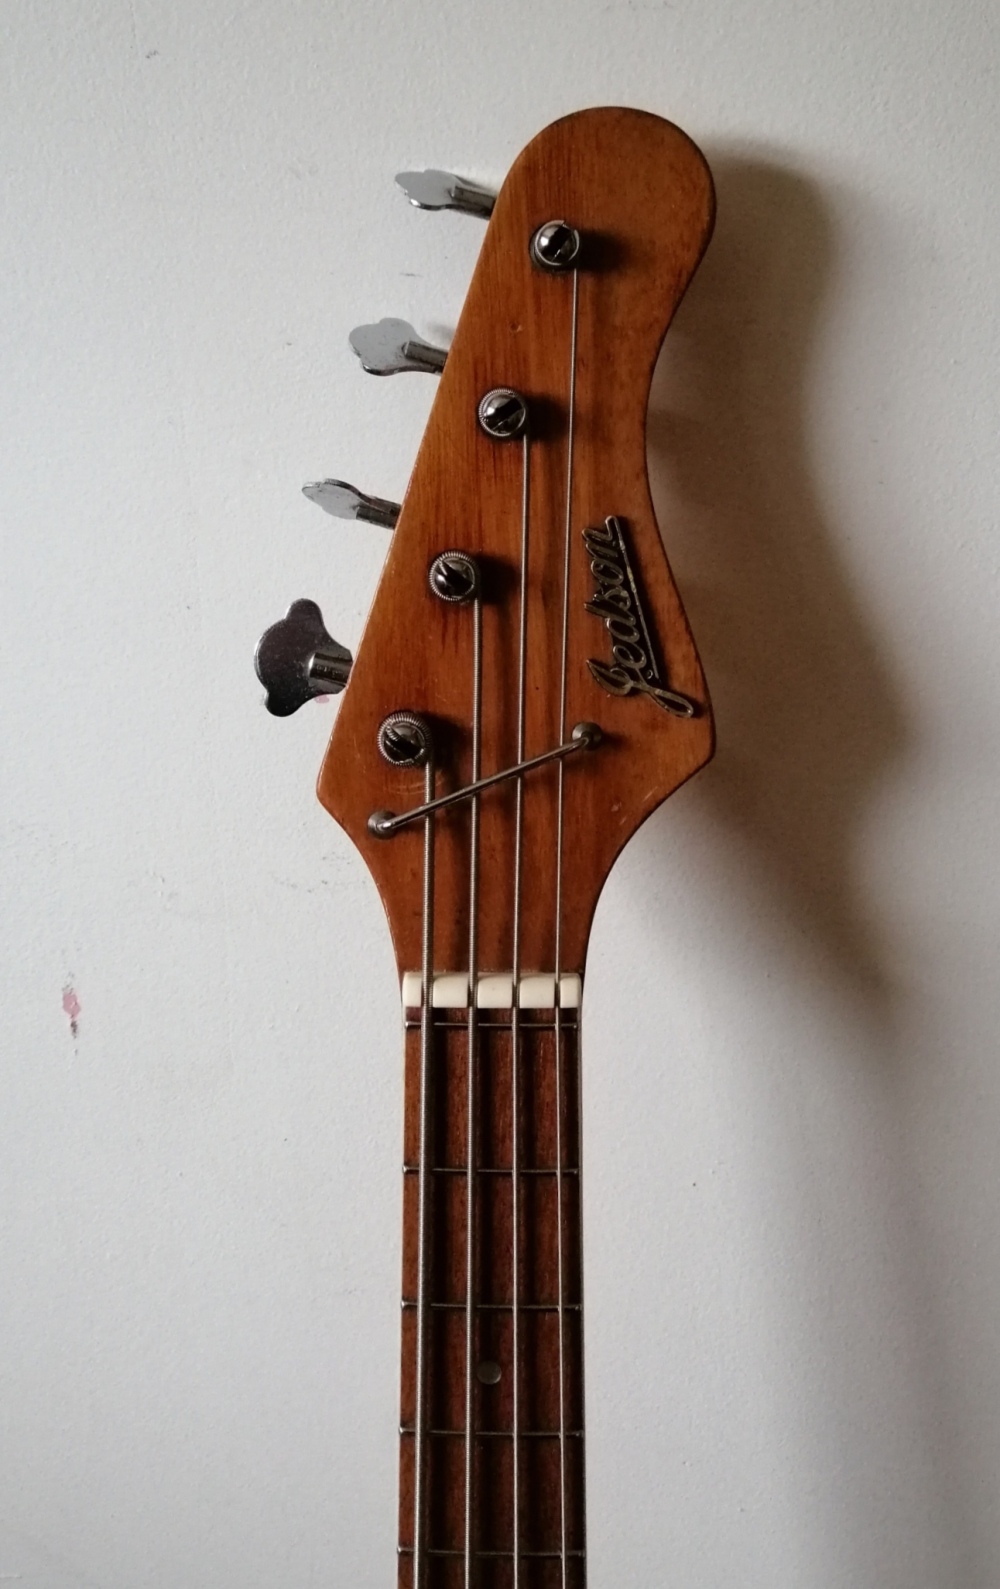
The bass was refretted as it was really unplayable. If you look at the bridge you will see it is at quite an angle because once I had finished the fret work and reassembled the bass, the intonation was so far out it meant it was unusable. If you listen to older recordings from this era generally the guitars are out of tune because the intonation was way out and strings were really badly made. The arrival of the round wound string in 1966 would change that, in time. The customer fully intended to make use of this so the intonation had to be spot on, and it was. The final tone is quite big and dark, as short scale basses often are. To provide some clarity I modified a set of short scale round wound strings (as opposed to flat wounds which were popular, or all that was available).
full frontal
dav
1970’s Morris Electric
This is an unusual one although they weren’t rare 40+ years ago. This is a is a one owner instrument that had been left in the wrong place for too long. I think the owner thought it would be cheap to fix but surprisingly, when presented with the reality, didn’t hesitate. It was truly dirty but also had a design flaw needing addressing. This comes from an era of price is king so very cheaply made. The body is plywood and the control compartment cutout left a very thin top on which to mount the controls. If you look, you can see where the jack socket has broken out. The vibrato is typical of the era, looking good but basically useless.
 A different aspect. The pickups were working but have a really low output, not cool at the time but currently, quite fashionable.

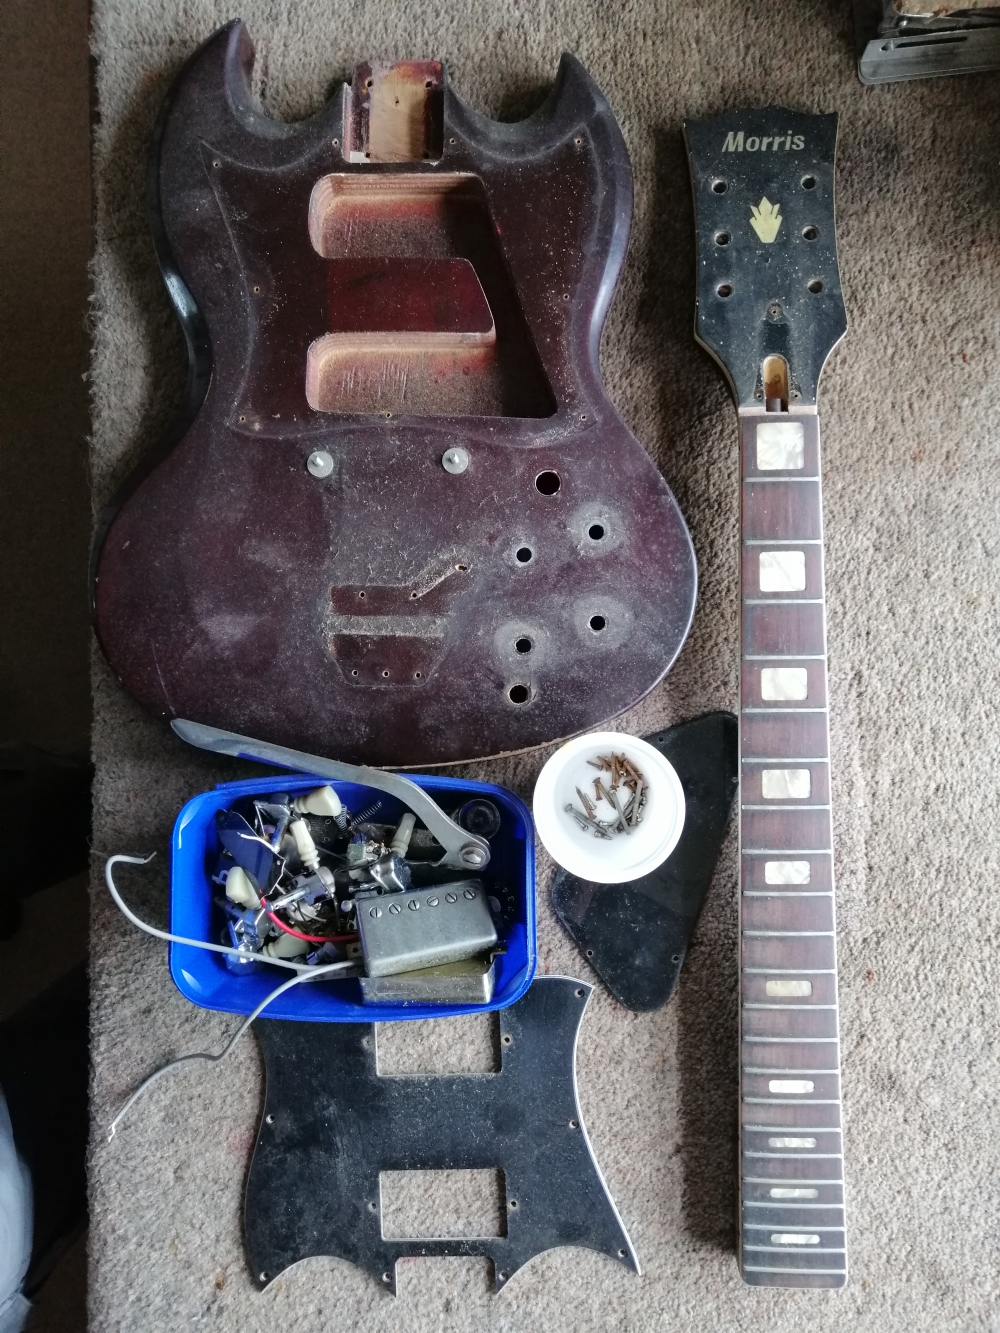
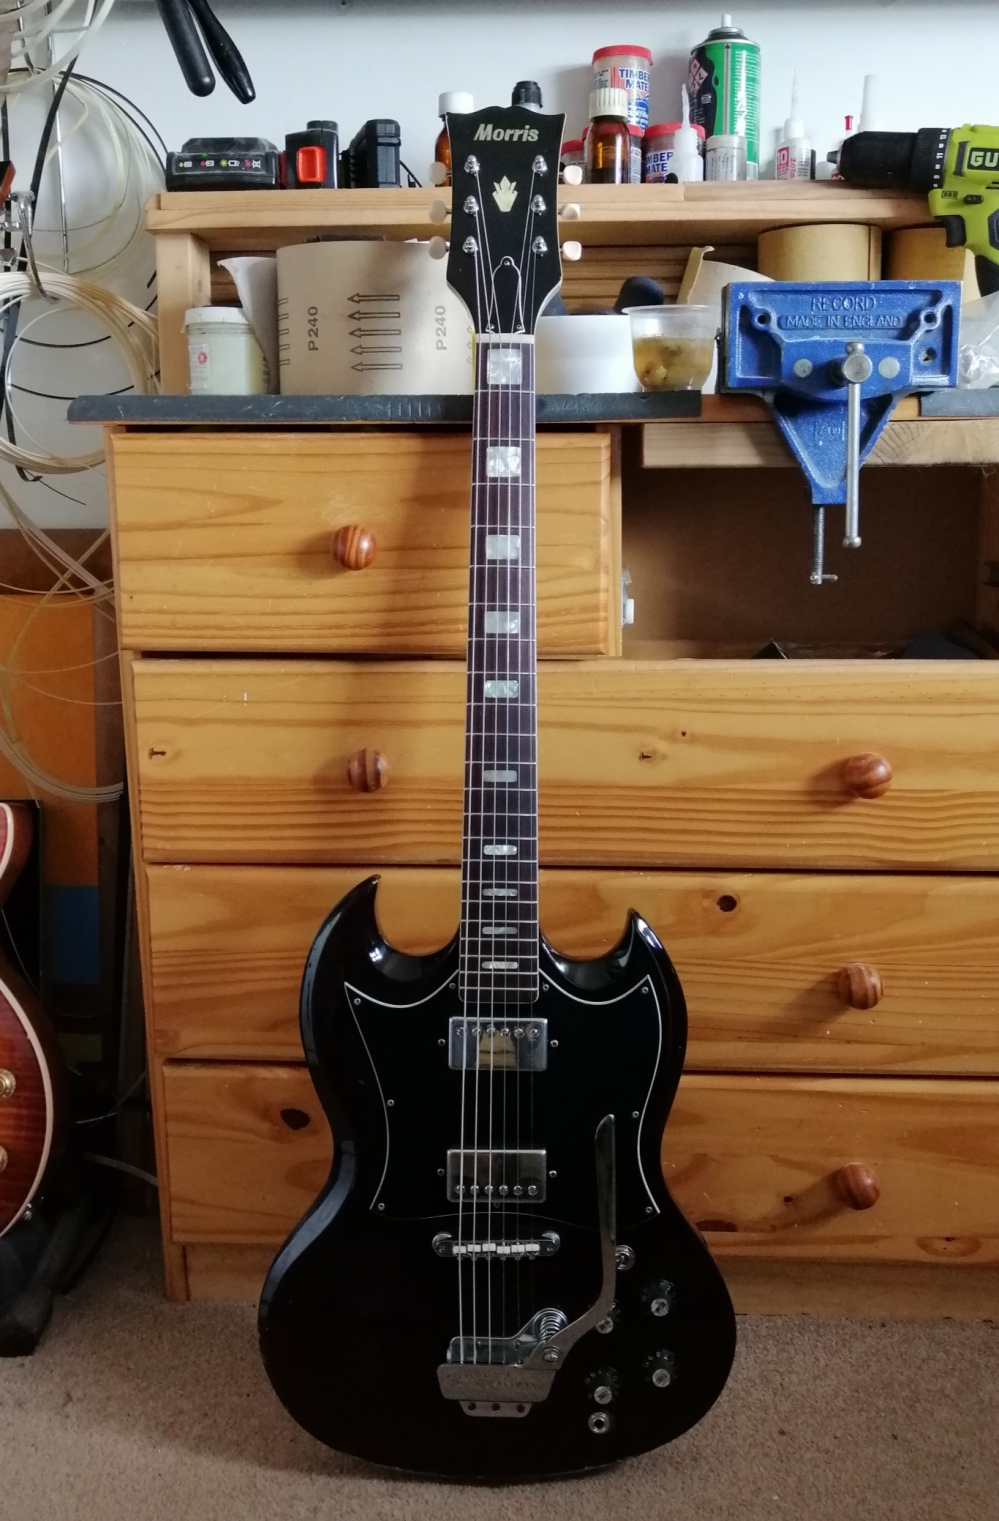
This is the finished guitar. Under all that grime and mould, the paintwork was in surprisingly good condition. All the metal parts were soaked in a popular brown fruity beverage overnight and then scrubbed clean. The control compartment was reinforced inside and rewired with current hardware.
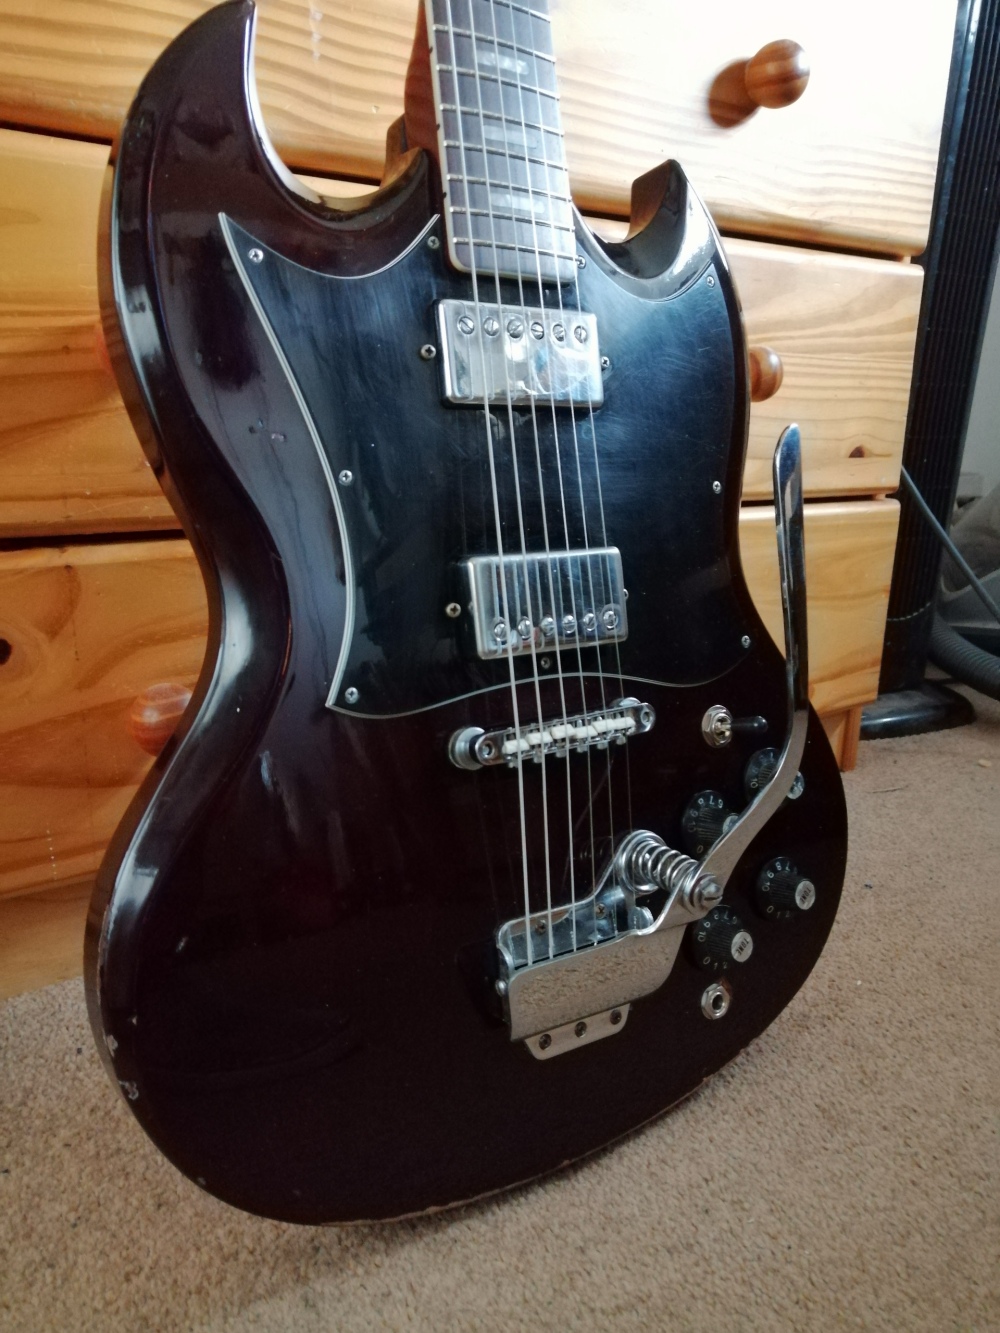
A general front view.
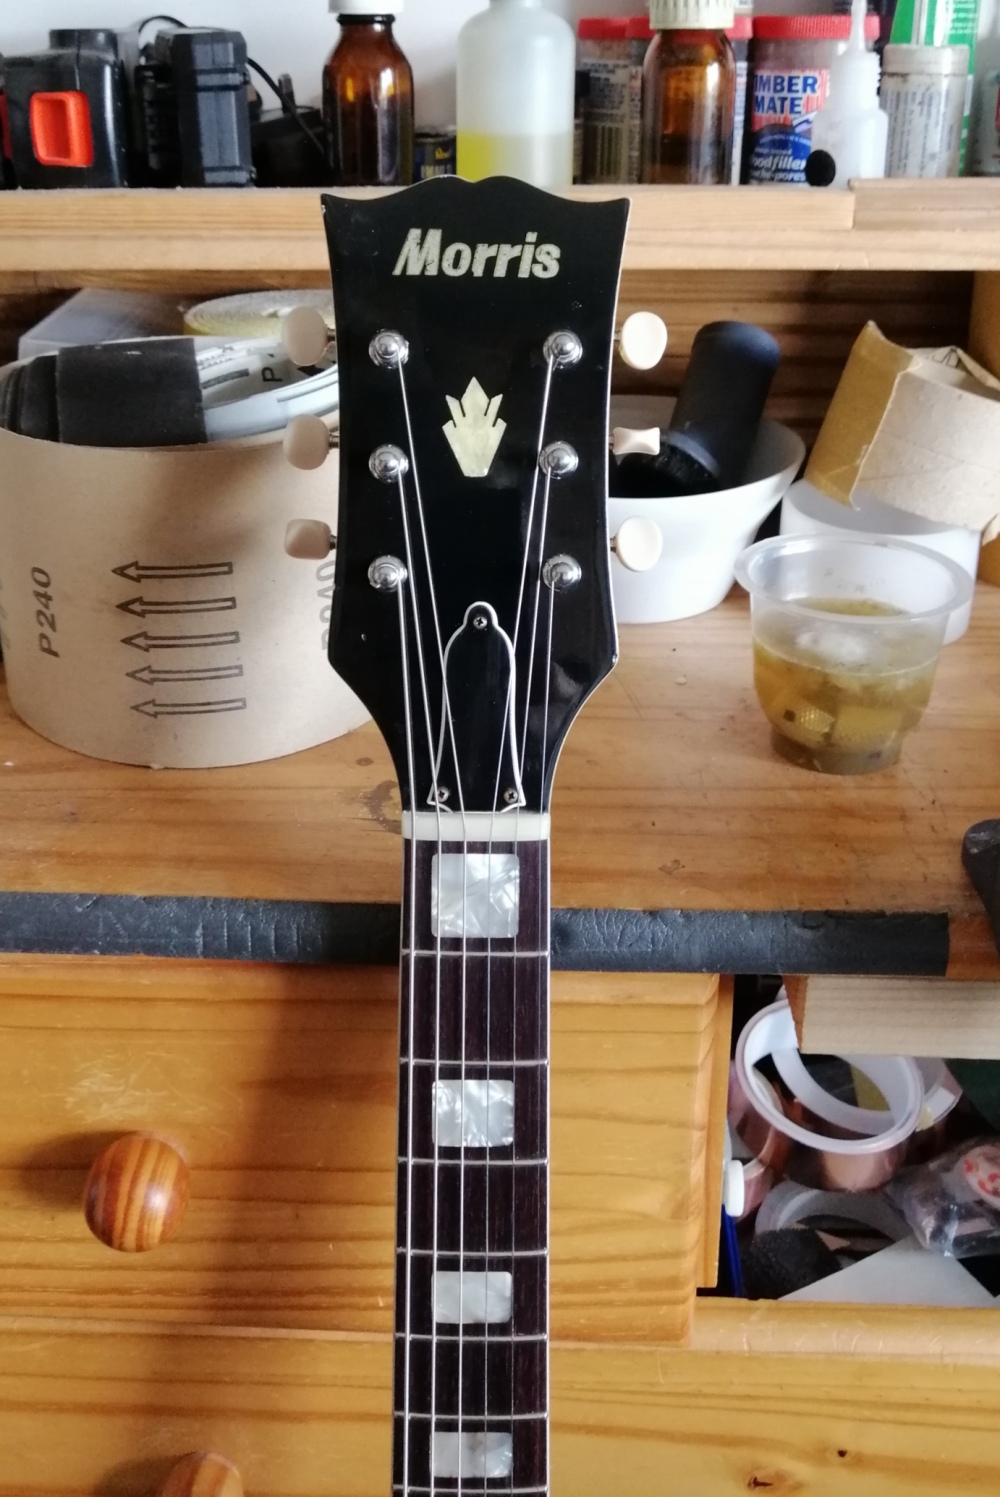
The headstock was in good condition overall and just required a decent set of tuners. That’s a new bone nut as well, the original plastic part was passed its sell by date.
1908 Gibson A Mandolin
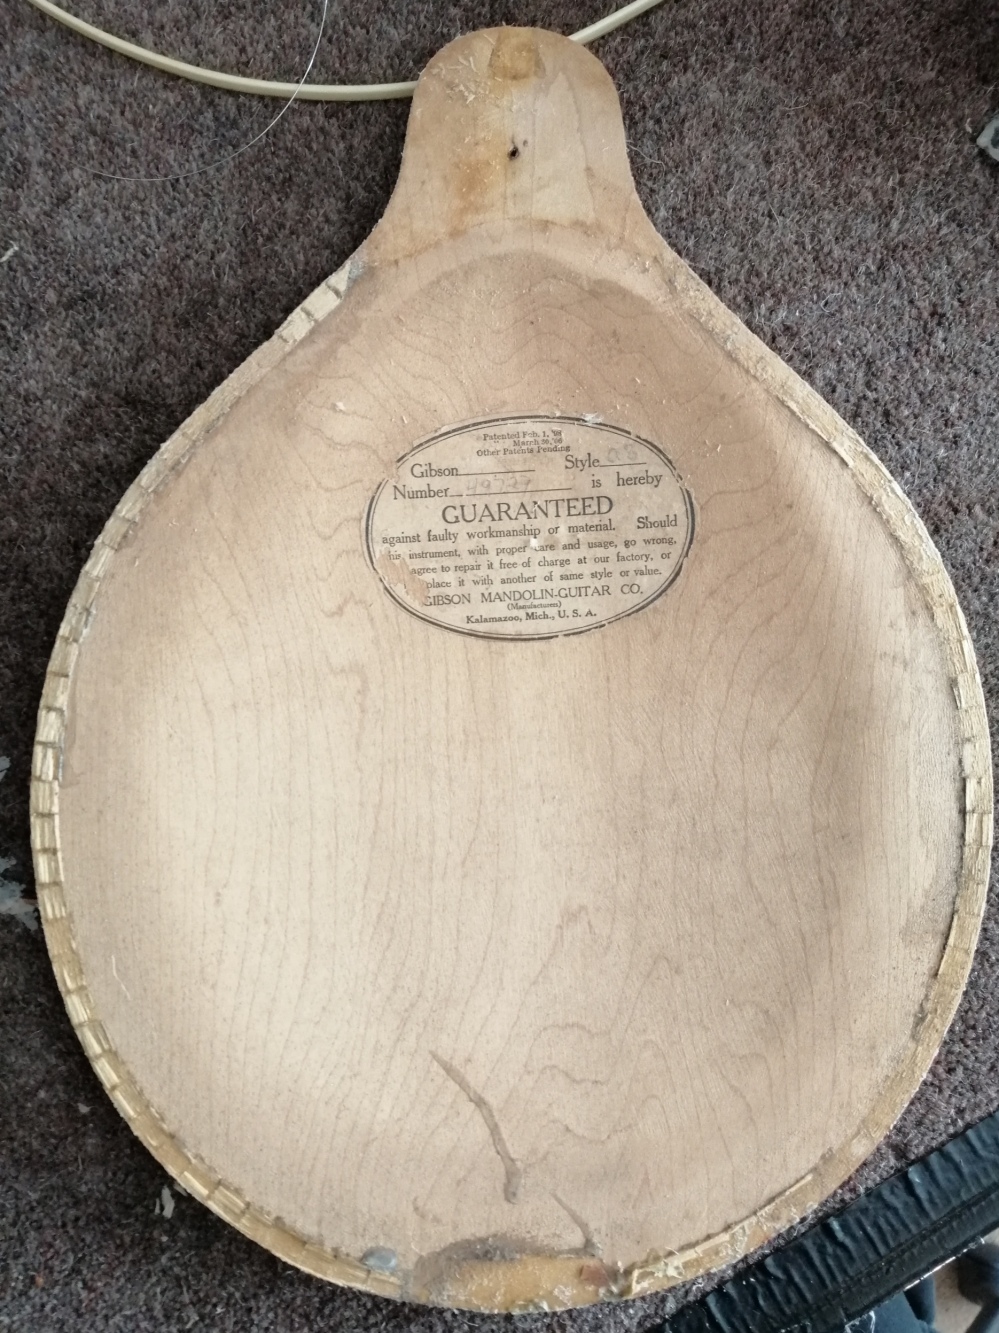
This was a project a long time customer and friend asked me to do but I was reluctant. Too often when you get started on these every old instruments there can be hidden surprises, this one was not the worst though. The factory, for some reason, painted the front white although for the era, that’s not surprising – wood was not so fashionable. It had chipped badly through thousands of gigs I expect and looked unsightly so, off with it and back to the wood. Many repairs had been done over the years as inevitably glued seams fail and the sides and back were quite misaligned. To correct them I had to slightly separate the back in order to realign it with the sides. Once I inserted the palette knife, it just ‘walked’ along the seam with very little effort, until the whole back came off. This allows an inside look at Gibson craftsmanship from the early 20th century, note the widely spaced Adirondack Spruce (from Upstate New York, popular at the time and has had a recent comeback).

This is the back. Although it’s “bowed” I suspect it was steamed rather than carved, in order to reduce cost but, I could be wrong. Nice to see the makers sticker still intact.
As this is a working instrument and had an untidy array of pickups and wires on the front, we decided to removed all that and start afresh with a pair of piezo discs that I make up as needed (the copper foil is for shielding). They can have a decent enough tone relative to the wood they are attached to as well as a decent output level and while a buffer improves matters, they work fine on their own and there’s no room for extra electronics here. The jack socket cable was kept to a minimum length but long enough to be retrieved via the sound hole if future pickup additions or upgrades were needed that can be soldered to the built in jack socket/strap button.
 The pickup cable is long enough to be retrieved via the sound hole but is inflexible enough not to contact the body.

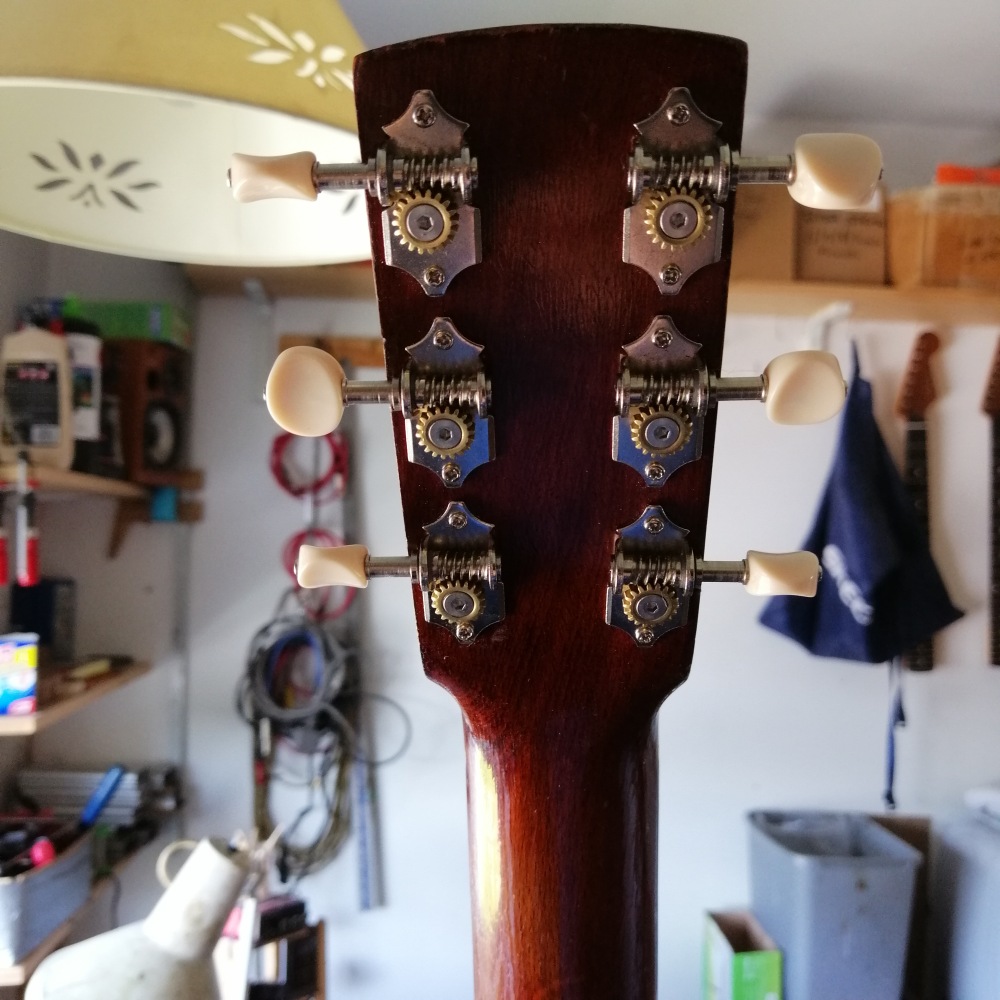
The original plan was just to do the body but the neck got included. The finish requested was “Not sprayed” so this is several coats of Tru Oil and around a dozen coats of bees wax. This is back of the Mandolin finished after full reassembly. Those are the factory tuners, still fairly functional. Note the trailing screw shaft/tuning button (these days, they’re usually ahead of the cog).
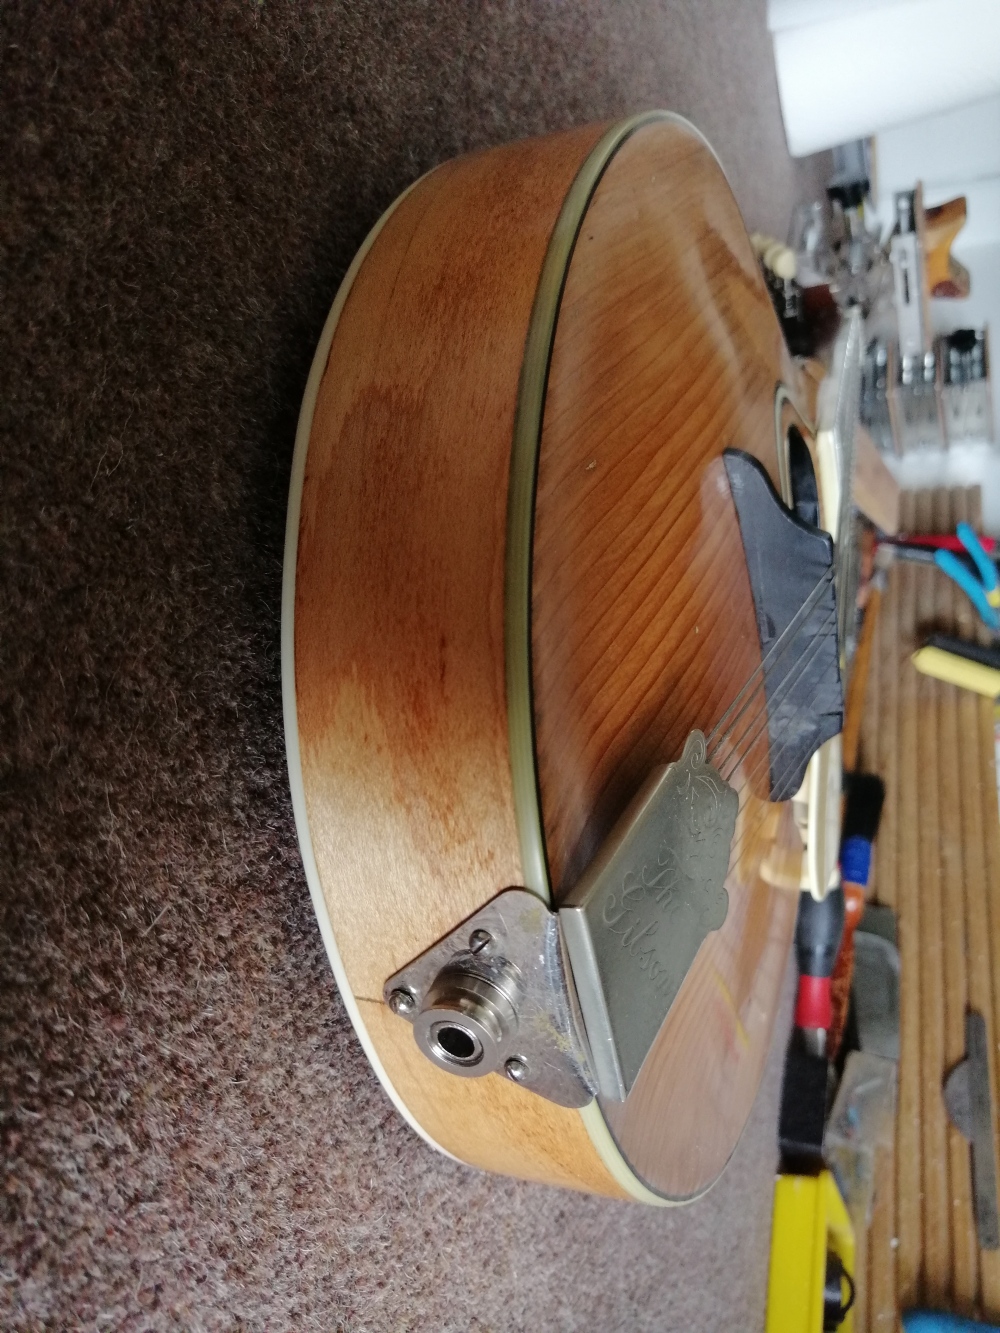 The original tailpiece was modified to take a jack socket and I don’t think it looks out of place. The strap button was put in vinegar to “age” the nickel plate in line with the the factory tailpiece and cover.
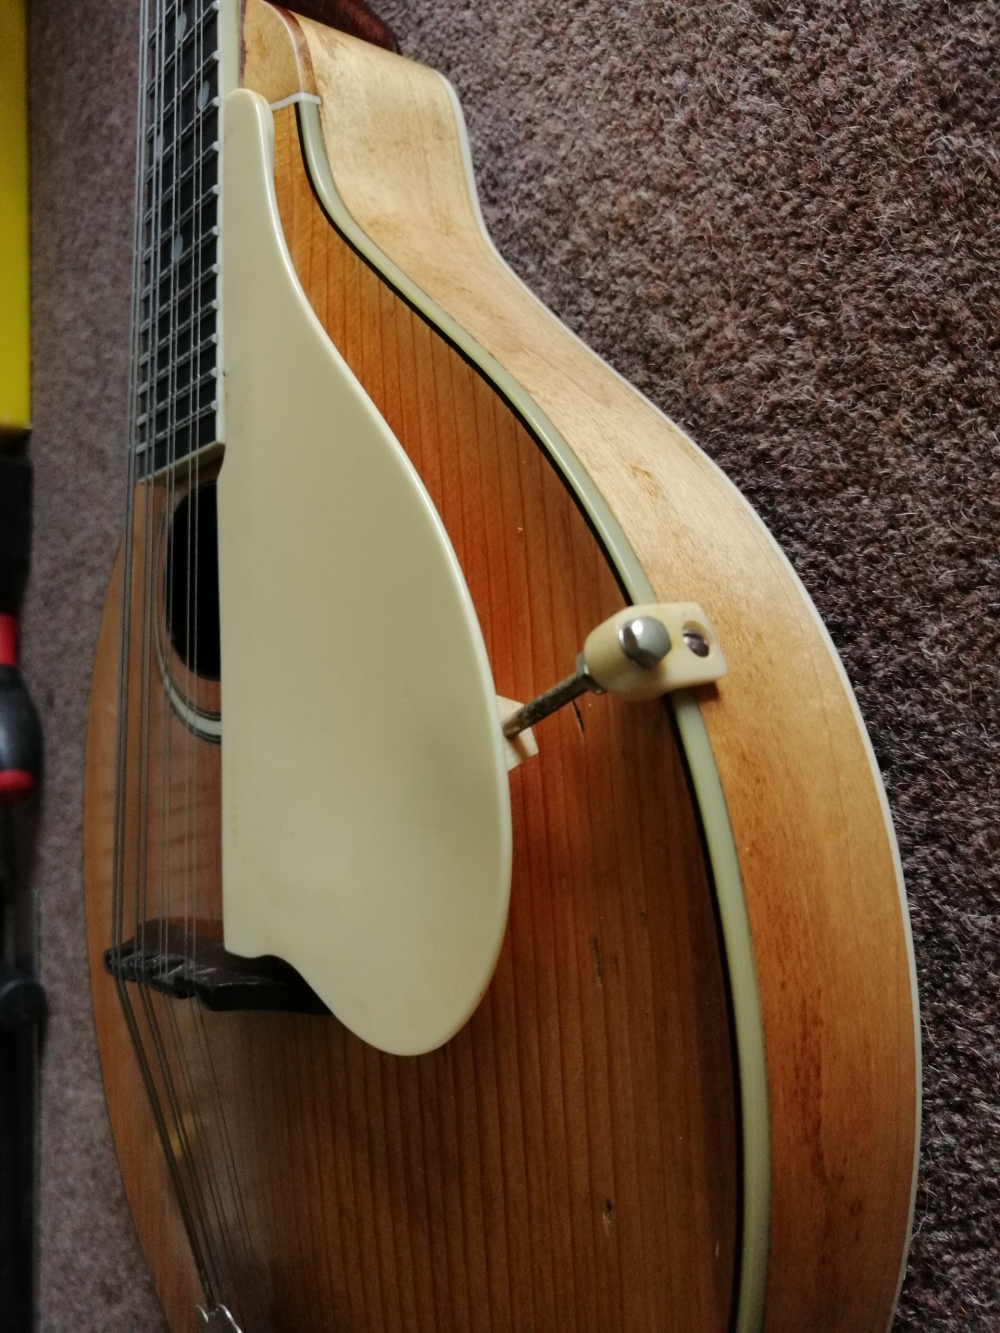
The factory pickguard holder mechanism was overly complicated and ineffective, and annoyed the owner. This is my solution. I made the body mount from aged Corian and tinted it to match the original scratch plate and found an appropriate flat head screw to fix it in place. I think it’s my favourite part of the project.
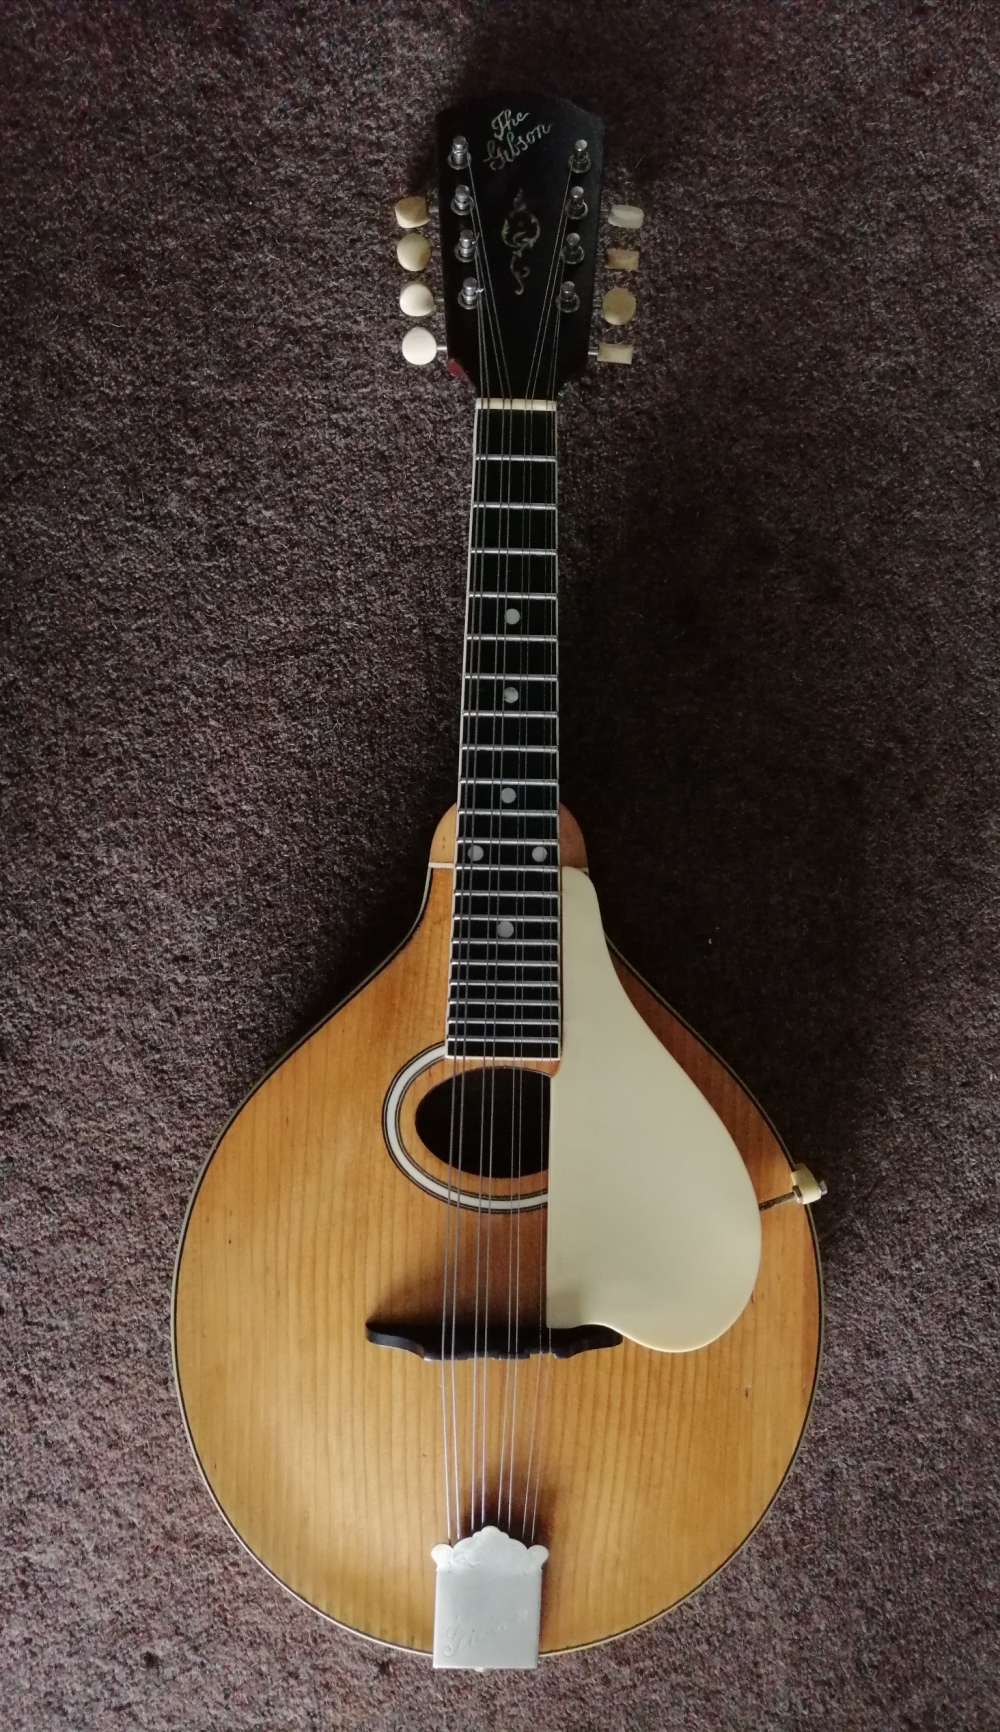
The finished project. That Spruce was very soft and tricky to remove the factory paint. We elected not to fix the dents and marks so it looks like what it is but just a lot tidier than expected, after 112 years.
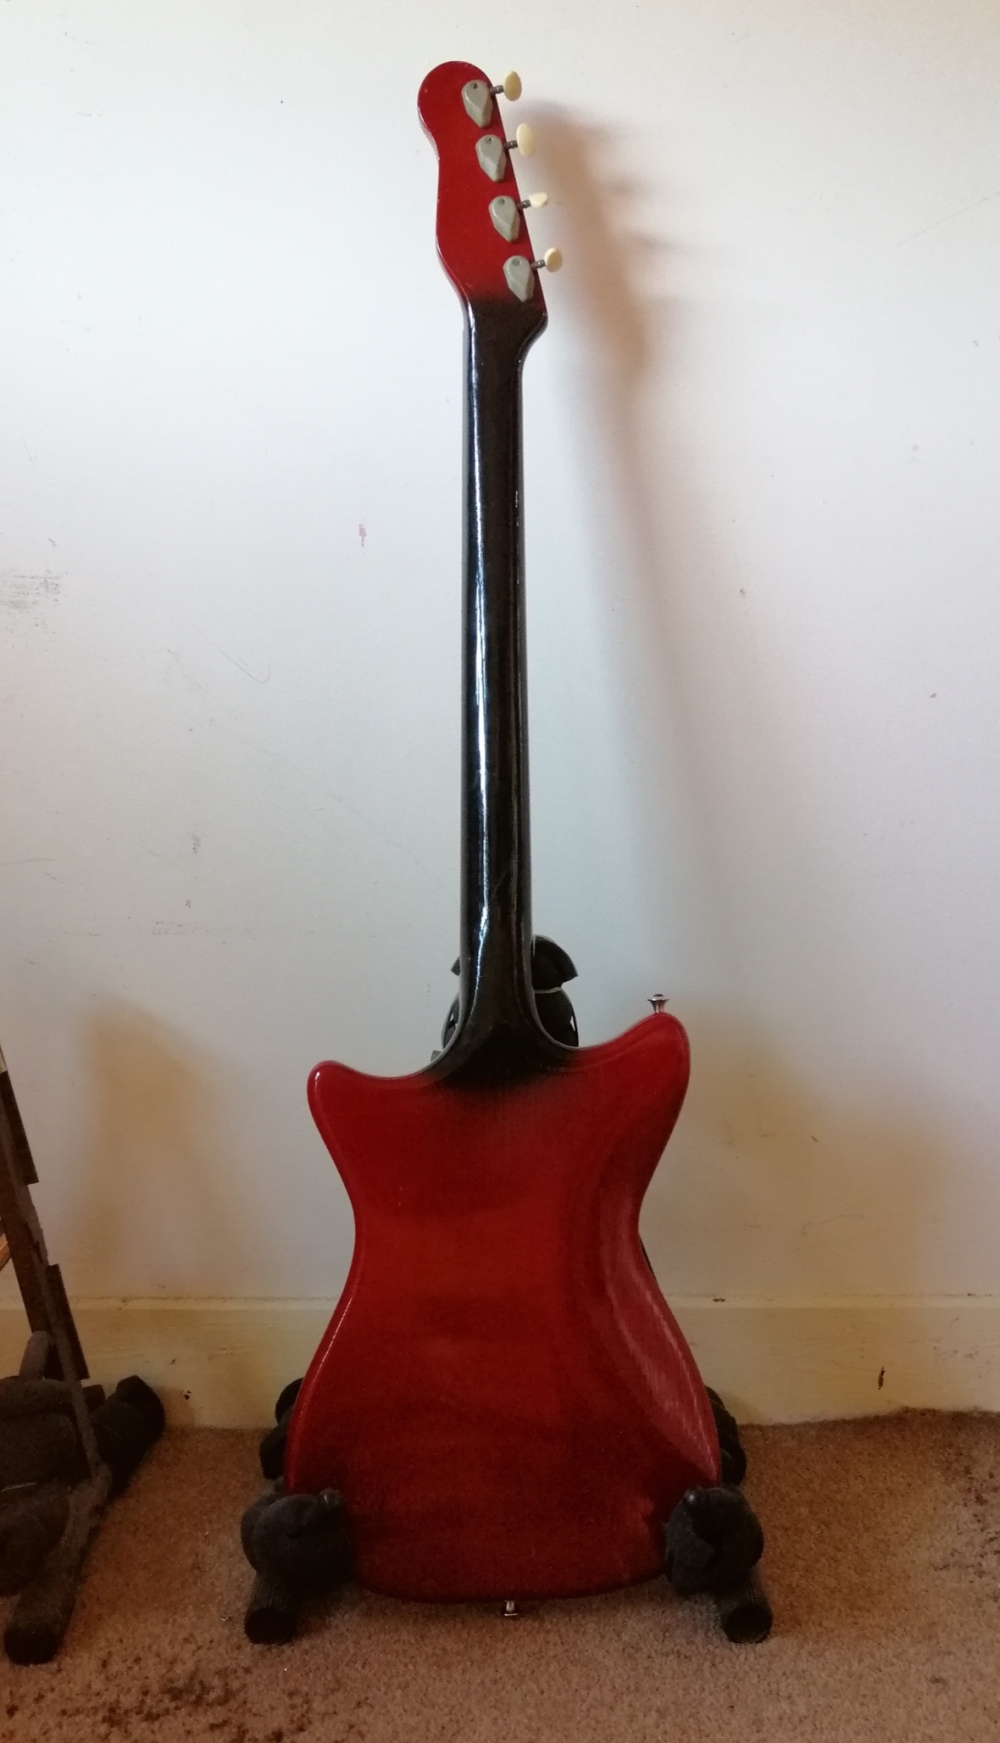
1960’s Burns Bison Bass.
This is one from 2021. A Burns Bison Bass from the early 60’s, owned by the original buyer, now long retired. This was a working bass back in the day when busy professional players could do anywhere between 7 and 14 gigs a week. Amps were smaller too so instruments tended to be played harder but this one is in remarkable condition. The paint and hardware is all original although a few ‘repair people’ had done some pretty awful work, such were the times. The Burns badge was glued on to the headstock but is missing now. Those tuners though are the originals and after a bit of cleaning and lube, they are remarkably smooth, although not great by modern standards. The original string guide was made of sheet acetate and long passed end of service, helped on by those mentioned above, I suspect. The only practical option I could see was to make one out of Ebony, and it looks like it should be there. Many guitars and basses from this era had a zero fret but usually it was twice the height of the rest of the frets so that had to go and a fret modified to look like it was fitted at the factory was fitted.

These were not really quality instruments, mass production and price were the key factors of the era. The later model Burns Bison Bass is of a higher quality and more advanced. The basic hardware like screws, were so corroded and damaged by incorrect screwdrivers that they all needed to be replaced. The fingerboard is an unidentified timber fitted with small frets and then lacquered, not so common at the time due to the increased costs. A good bit of the hardware was crudely made with sharp edges, nothing a quick file, sand and polish couldn’t fix. The standard of chrome plating though was high enough that a good clean bought it up nicely, and looking right for its age.
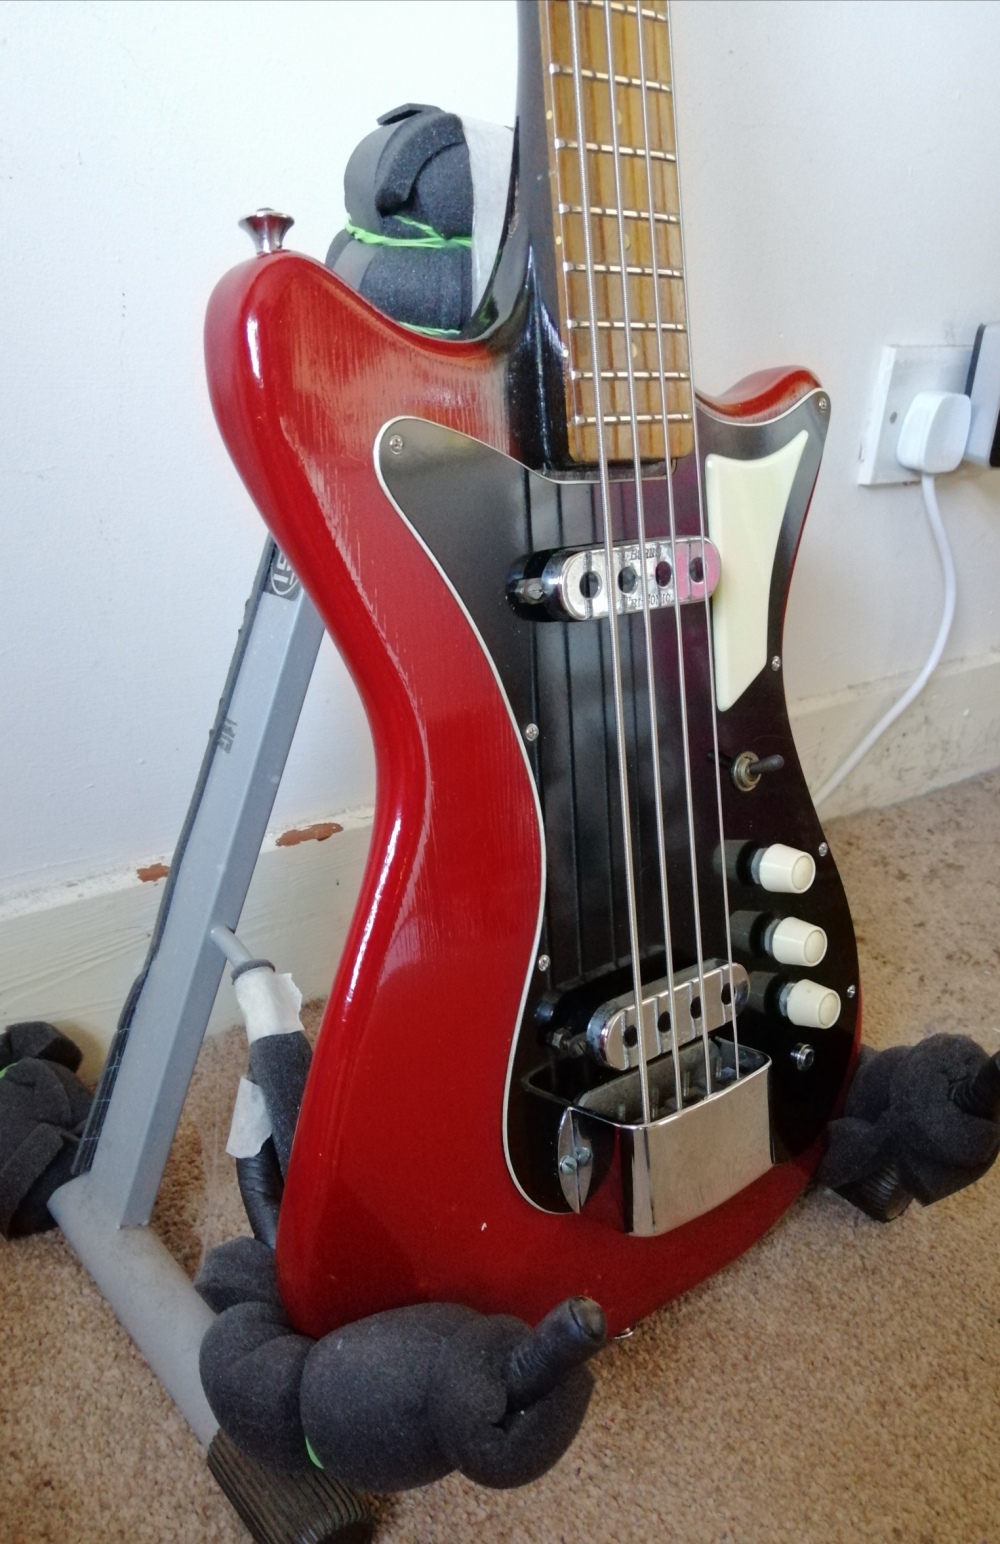
Some heat treatment to the neck and a bit of fret trimming allowed an acceptable action to be achieved, it is after all a short scale bass (30″). The Bakelite pickguard and plastic insert came up nicely and also the knobs, items that rarely survive long term. Plastic technology was fairly new back then and while it was touted as the future of all materials, it would take another 30 years to realise that plastics were finite and susceptible to chemicals like sweat and alcohol as well as UV light although sunlight wouldn’t have featured greatly in this basses life I expect.

Original tuners.
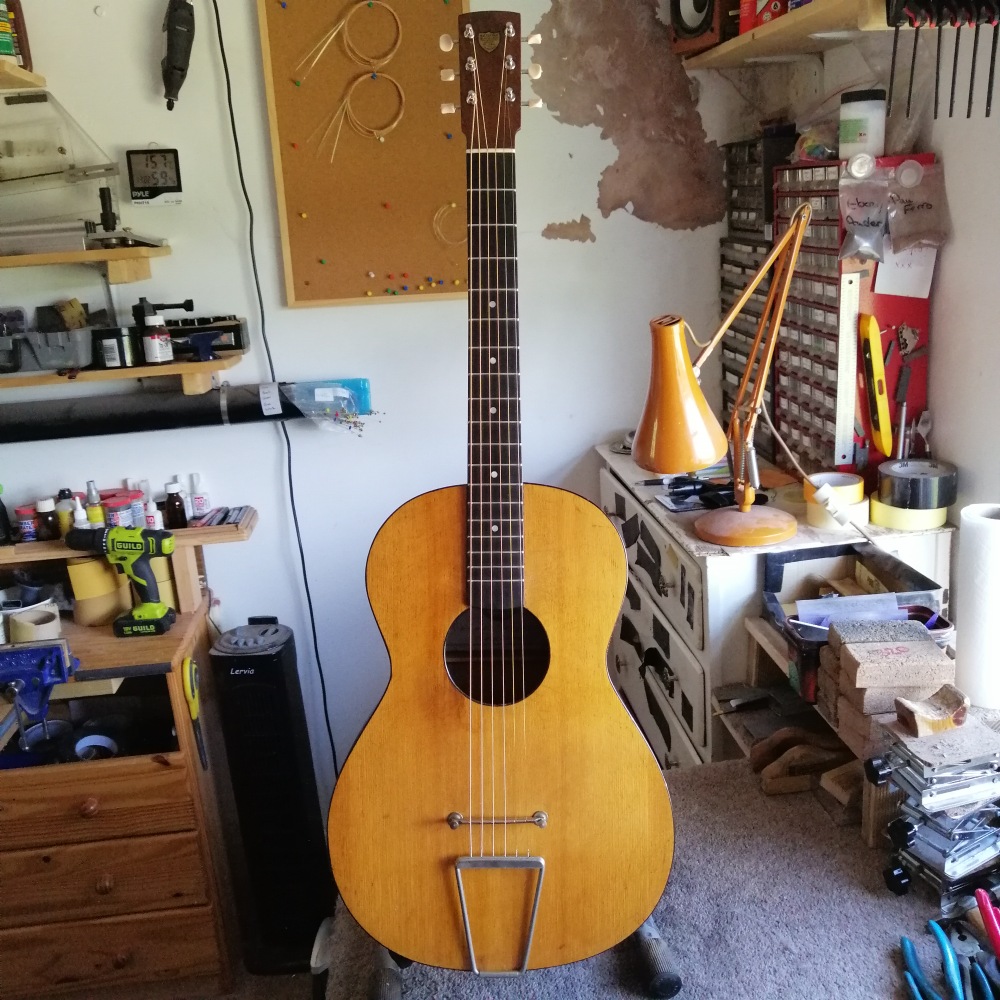
Runesson acoustic.
This is a very unusual acoustic from Tyko Runesson, a small Finnish luthier. To say they are different is understating it. First off, if you look at all the pictures, excepting the extra 3 sound holes on the upper side (which normally has a negative effect on the projected sound, but not here), one might think this instrument was made around WW1. It’s certainly a very old looking layout, even the screw fixed neck (hidden behind the front strap button) looks appropriate. The carving is all hand done, close inspection shows this, and is a of a very high standard. Because the strings are top loaded through a trapeze tail piece, the tension of the sound board is reduced substantially. Consequently, lighter bracing can be used and even though these 000 and OM sized guitars are always louder than expected for their size, this one has a huge voice. The combination of woods used was apparent in the tone so I fitted a set of nickel wound acoustic strings (not the same as nickel wound electrics) that add little colour so you really hear the instrument, not the string
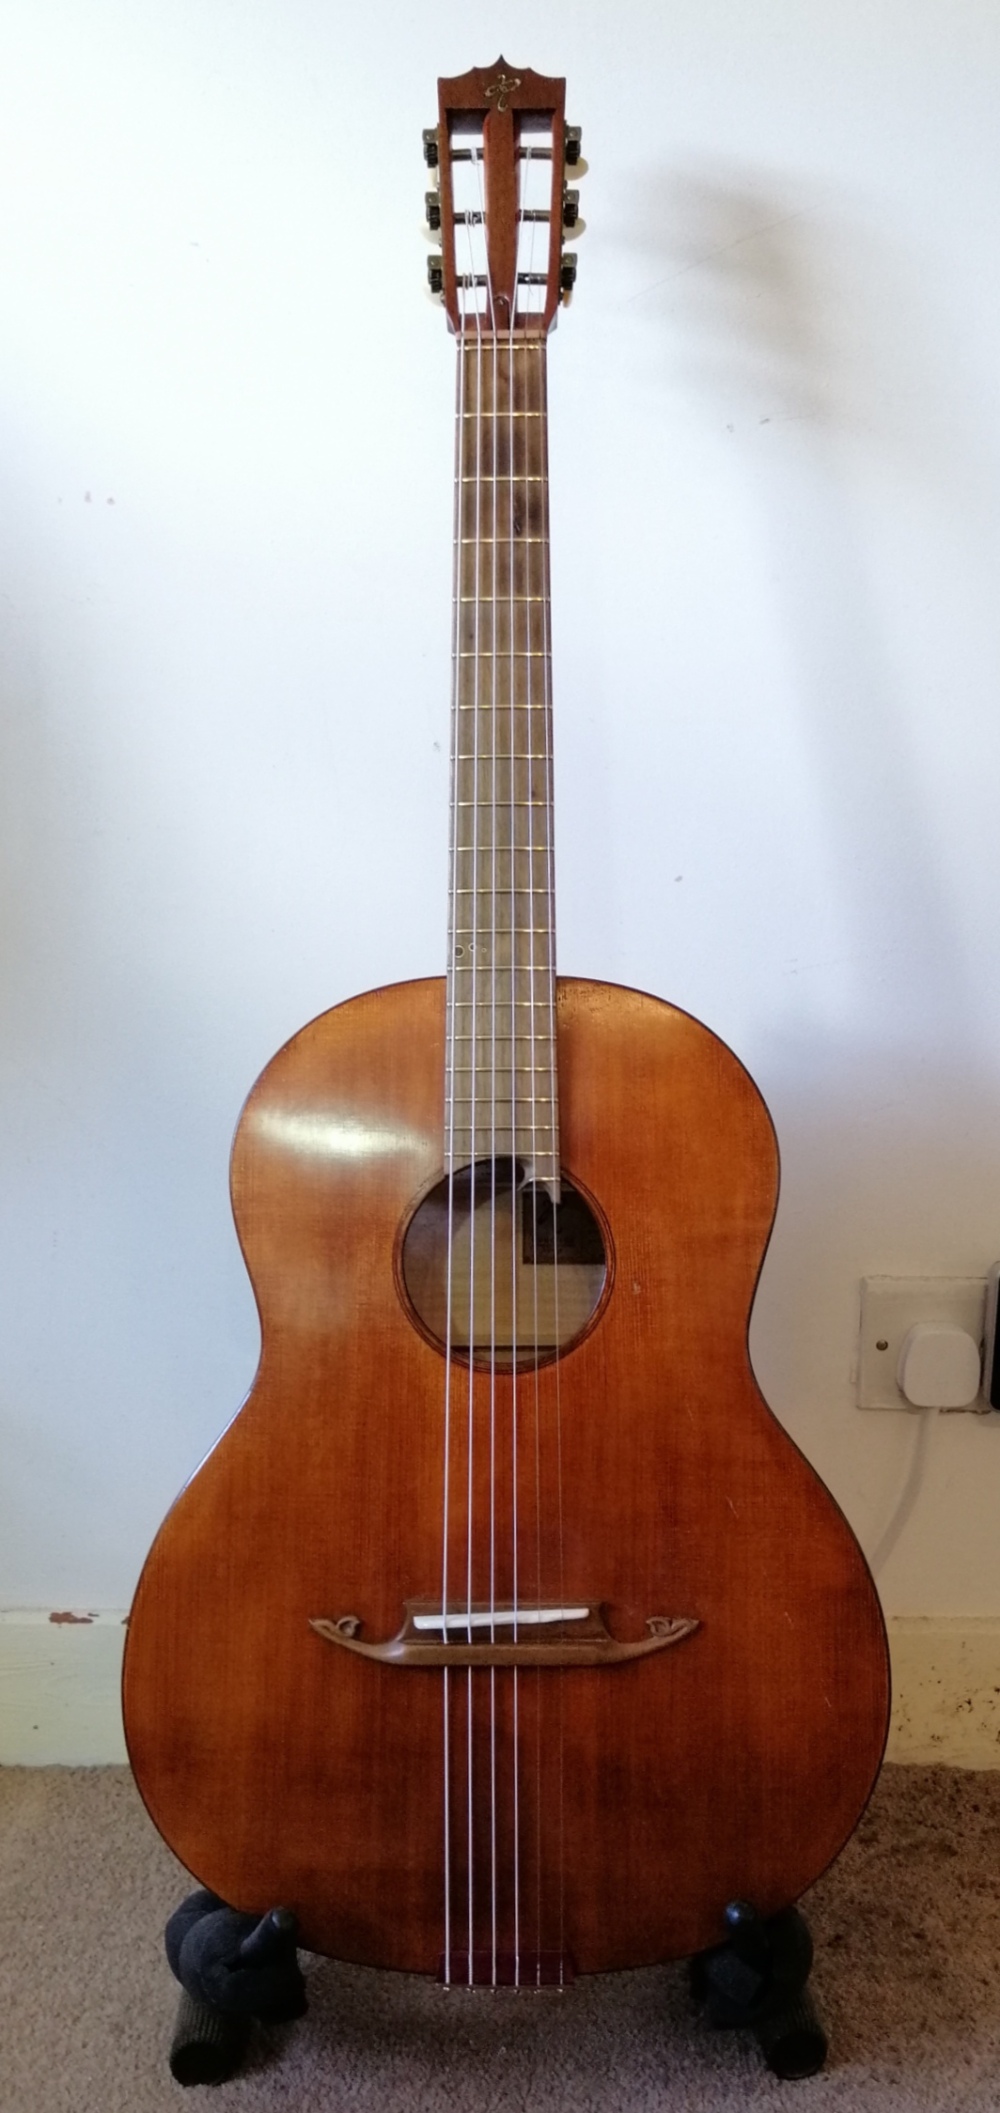
The wonderful carving on the back and front of the headstock, and those tuners. easily looks 75-100 years old. There is a carved in signature under the fingerboard that says “Runesson no.69 2014”.

 The neck is fixed on with a very longer threaded screw that uses the strap button to disguise it. there is a metal receiver plate attached to the neck to fix it to and also allow for neck angle adjustments if needed.
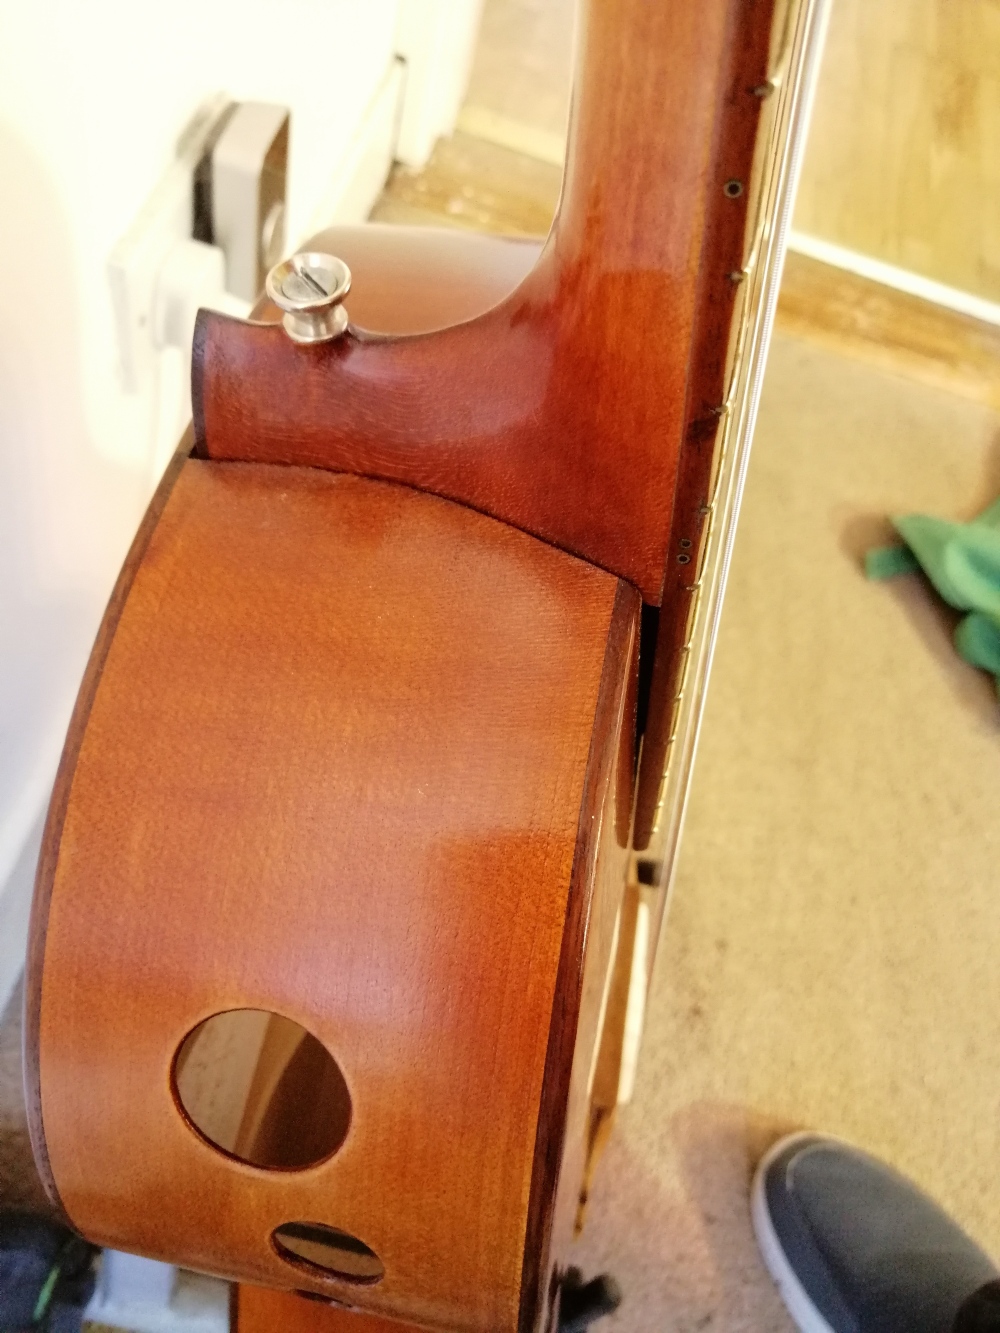 Three extra sound holes so the player gets to hear all that’s going on. The neck and soundboard are “floating”, that’s the gap under the fingerboard at the body, they’re not touching.
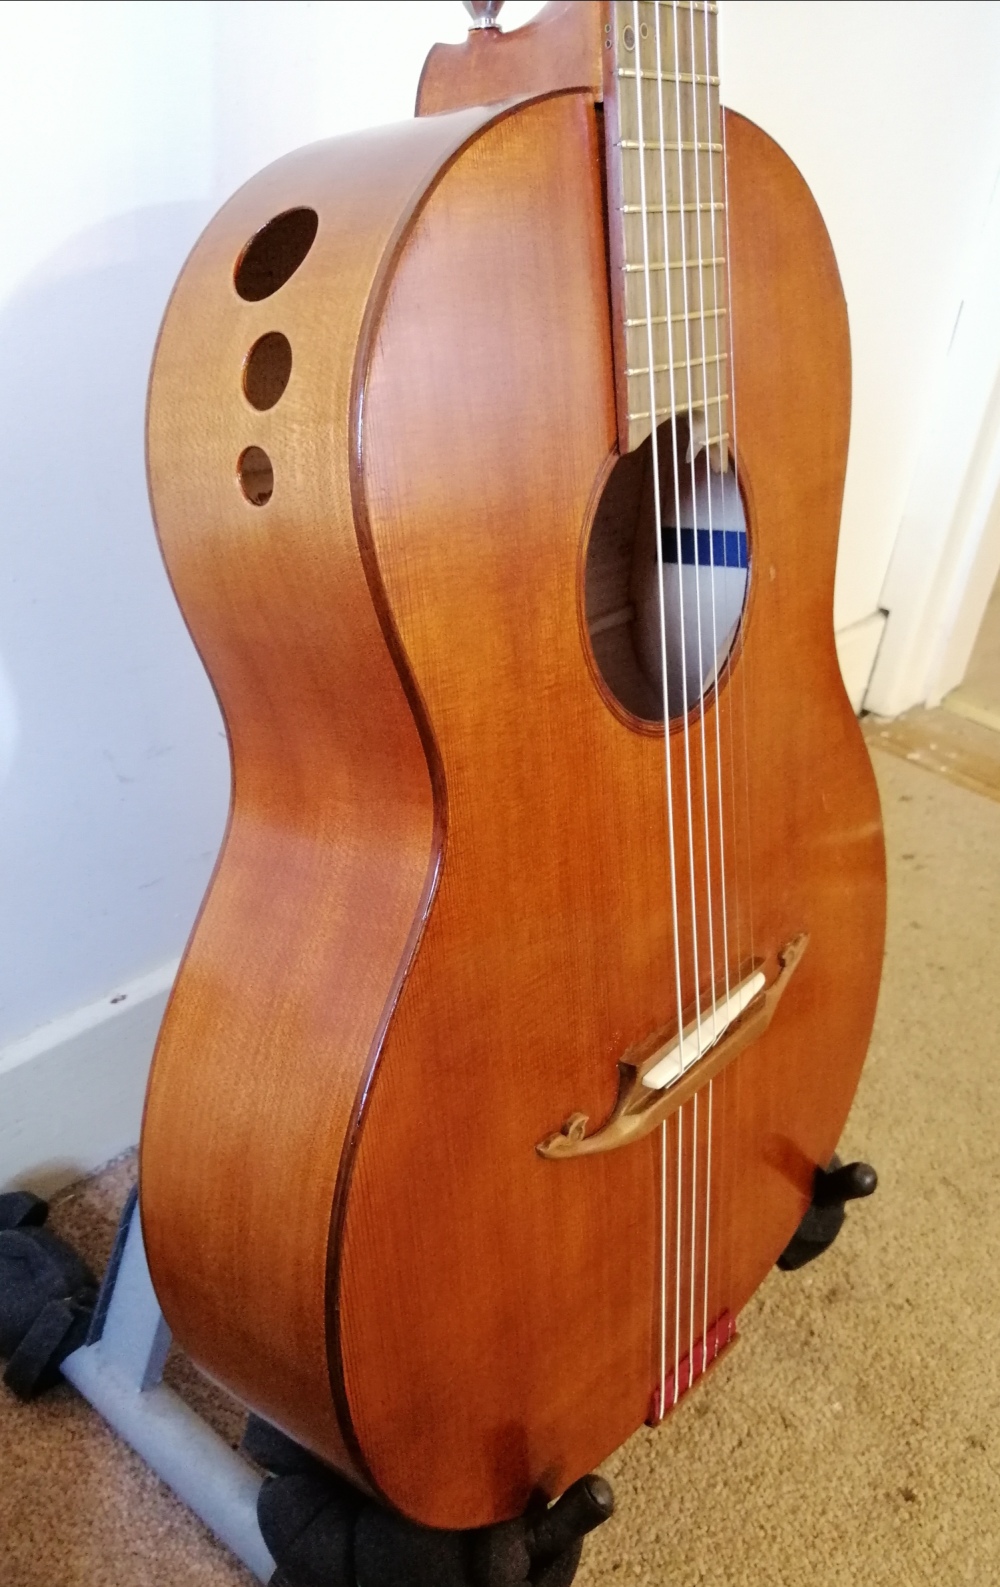
1976 Gibson Gospel – Refurbishment.
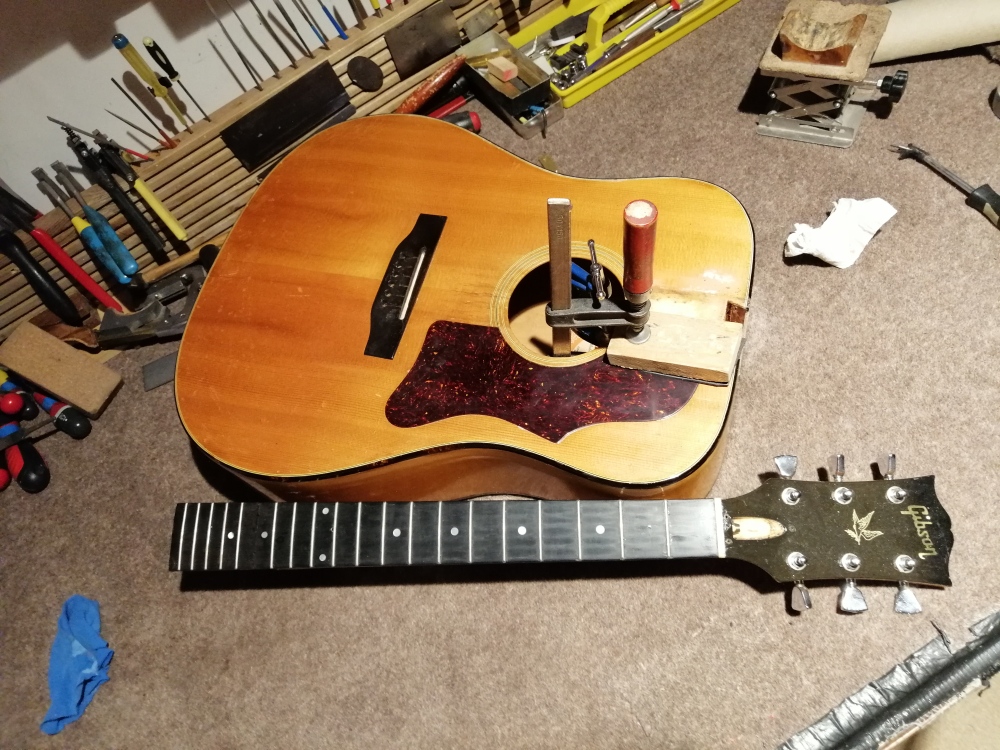
This one came in last year. A rather rare, in this country, mid 70’s Gibson Gospel bought in from the US shortly after purchase. This is part of the Gibson Hummingbird/Dove collection differing in the lack of visual adornment popular during the 70’s. This would have been a more basic ‘working’ model but also having a moulded, round back as opposed to the flat type found on most Dreadnoughts. It has lived over the bar in a pub for many years, apparently, available to whomever wanted to have a go. There have been several less than professional repairs made and at least one poor quality refret. At some point someone attempted to remove the neck probably to lower the action. I believe they failed in this as while it’s an over used term – “reset the neck”, the actual process requires knowledge, skill and the correct tools. It would appear during this failed attempt that what resulted was actually a negative neck angle which caused the strings to have a greater height again. The bridge was paired right down, as in the photo (at least 30% height reduction) to compensate and a wider than normal saddle was made. You can also see the cut outs for the strings to be able to clear the bridge and have enough angle over the very low saddle. Due to the lack of depth of the resulting bridge work, the string end windings would have been pressing on the back of the saddle and while this is an unsatisfactory approach to lowering the action, if it must be done then one must replace at least the same amount of material under the bridge, in the form of a plate to allow the strings a stable surface to lock into.
The original plan was to repair or replace the upper body Tortoise shell binding, fix some badly repaired structural parts and refret the neck. Once into the job I realised the neck would have to be removed and reset, hence the pic below. The original Ebony fingerboard had cracked during the previous attempt (too much heat used and the damage unrepaired) and whoever did the refret left nearly all the fret slots chipped and unsightly so I decided to pull the fingerboard and replace it with a new one, slightly thicker too. The removal of the 15th fret you can see in the picture is to facilitate insertion of a steam nozzle into the dovetail joint area. This softens the glue and with a proper neck removal press, the whole thing can be separated cleanly. The clamps are repairing a crack that ran along the treble side of the fingerboard/soundboard (possibly caused by the attempted neck removal or as mentioned below, the curious vintage Gibson pickguard problem).
This photo shows the carved up bridge and modified saddle slot. Once a new fingerboard had been decided upon, this bridge would have been out of place and too low anyway with the new neck angle. A new part was made with a more correct saddle size (there is a Fishman piezo pickup under the saddle).
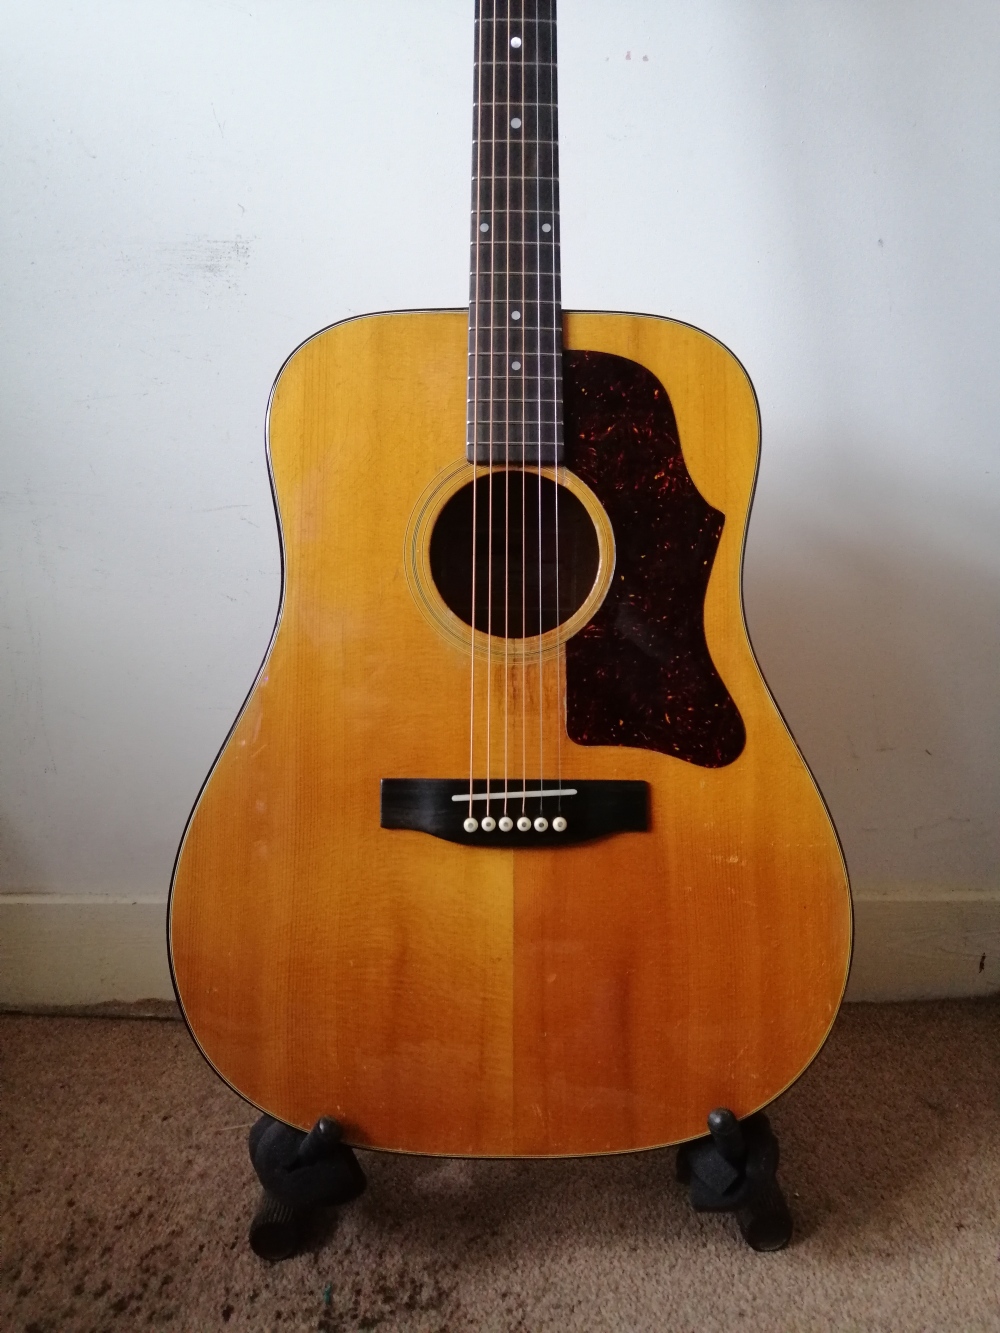
Here’s the finished guitar. the factory paint was in excellent condition so a good clean and buff bought it up nicely. Unfortunately, on the top, someone had over sprayed what ever repairs had been carried out with I suspect, aerosol cans. It’s not too obvious and I managed to blend a lot of it in. One thing that is unusual on these older Gibson’s is there is no splitting alongside the pickguard. The factory fitted fairly substantial celluloid guards so when the Spruce top contracted (as they do over time), the glue on the bottom of the thick pickguard held firm and of course as the celluloid is not flexible, so the tops cracked longways, often from bridge to neck. That’s a vintage/unbleached bone saddle and bone pins, should last the life of the instrument as well as enhancing tone. The first 7 frets are stainless steel too as I don’t think this guitar should be interfered with again. That’s where I always mount batteries in acoustics (inside the sound hole), unless there is an external holder. Once in the playing position, only the player can see it and if it comes adrift, that’s obvious, but also should you get caught out and need to change it in a hurry, slackening the top 3 strings should allow one to slip one’s hand in and reach the battery. I am not a fan of the Velcro bags or clips that attach to the heel block. The bags fall off after a while when the adhesive gives way (unless they have been properly installed, which is rare) and both are hard to reach unless you remove all the strings, or have a handy midget.

The lacquer on the headstock was expectedly chipped and scratched so I repaired that and also many dents and chips on the back of the neck were fixed too. As it was out of the body, the whole thing was refinished using a slightly duller than normal 30% gloss lacquer on the headstock and matte on the back and sides. Those are the factory tuners, Schaller made but marked Gibson, which is why they still work perfectly 45 years on. At that time, Schaller were probably the top tuner maker and while Gotoh acquired them around 15-20 years ago, they wisely left them alone to carry on making high quality hardware. Many who would buy such a name might choose to lower the product quality and use the established name, and perceived quality, to sell a cheaper product at the same price, to inflate profits. Today, the high end Gotoh hardware is easily on par with Schaller and in many items, ahead of them in quality, mechanics and finish.

1977 Musicman Stingray fingerboard replacement

This is a 1977 Stingray that came to me from a gentleman who has a lovely collection of old MM basses but this one was in a collection of parts. The neck is a 77 Maple affair that had been damaged beyond repair at the nut. The only option was to plane the fingerboard off and install a new one, The customer chose the correct timber for the year (Pau Ferro). This is not a simple job because the way a one piece Maple neck is made is a bit different form the type with a separate fingerboard. As it wasn’t going to be original a few mods were made, more about that later. I did unfortunately make an error though, the MM of the year didn’t have the 21st fret dot marker. These basses were largely hand made and the fit between body and neck, and other parts, is often terrible but within the genre, quite acceptable.
The new neck had to be the same thickness and radius as the old one but the owner did go for me carving the neck into the heel which allows more comfortable access and was not and is still not used on these types of instrument.
Carved in heel. The marker dots on the side of the neck were where I had to plane down to but due to the hands on way they were made, not in a straight line.
The end of the fingerboard where it joins the head stock was tricky as the original finish and logo couldn’t be interfered with on the face plate. Also the plastic trim around the truss rod was missing meaning I had to mimic one. Many hours and thin layers of black dyed epoxy being moved around the hole with a tooth pick till it set. The sharp eyed may notice the odd arrangement of the E string through the nut. This is not a mistake. The first generation Stingray was strung through the back of the body and as such requires a super long E string. As the other standard long scale strings are able to clear the nut, that’s not an issue. The E however does not so I cut the nut accordingly for the commonly available strings of the brand the customer favours.
I was able to colour match the rest of the neck to the headstock and overall, I think it turned out well but more importantly, the very particular customer thought so too.
The body on this bass is also around 1977 but the neck, body, electronics and hardware came from mostly overseas and all date to a similar time. The hardware and the crucial pickup and original preamp command large sums of money these days and oddly, despite modern tech, few of the clone preamps get it 100% right. The reality most likely is that the old preamps are just that, old, and the components have aged in a way that can’t be replicated, like Stradivarius violins. The body had some damage but was nicely repaired and era correctly finished by the “Guitar Workshop” in Dublin. It’s worth noting that this is the first generation Stingray which had a slab/no contour/no cutout body. Original MM bodies are rare and fetch silly prices. Although this project ended up costing the client several thousand euro, oddly, it’s a whole lot less than a similar condition original would cost and it is unique in its class.
Upgrading a Gypsy guitar

This arrived in a couple of years ago, a French made Gypsy/Selma type guitar. The neck was super thick and the fingerboard was really badly made with varying fret intervals and dreadful inlay. It also didn’t have a truss rod, hence the thick neck, so thick that the customer couldn’t play it. So, off with the fingerboard and installation of a 2 way truss rod followed by some serious recarving on the back of the neck. To be fair to the maker, all the timber is good quality, the execution just wasn’t of the same standard.
To be different to all the other Django guitars, we decided to use Pau Ferro for the fingerboard instead of the usual Ebony. Also, for the sharp eyed, the customer went for conventional dot spacing as opposed to the slightly odd system normally used on these guitars. The original fretboard was almost flat too, quite uncomfortable for mostly steel string players. I have come across this several times on hand made guitars, the radius makes a big difference. One can also see the good quality of the flamed timber on the body side, the top too was a nice straight tight grained Spruce pair. The heel also is worthy of note in that it’s a standard guitar shape and size and not the almost flat/non existent profile this genre uses because the whole fingerboard features in Gypsy Swing, unlike most other guitars.
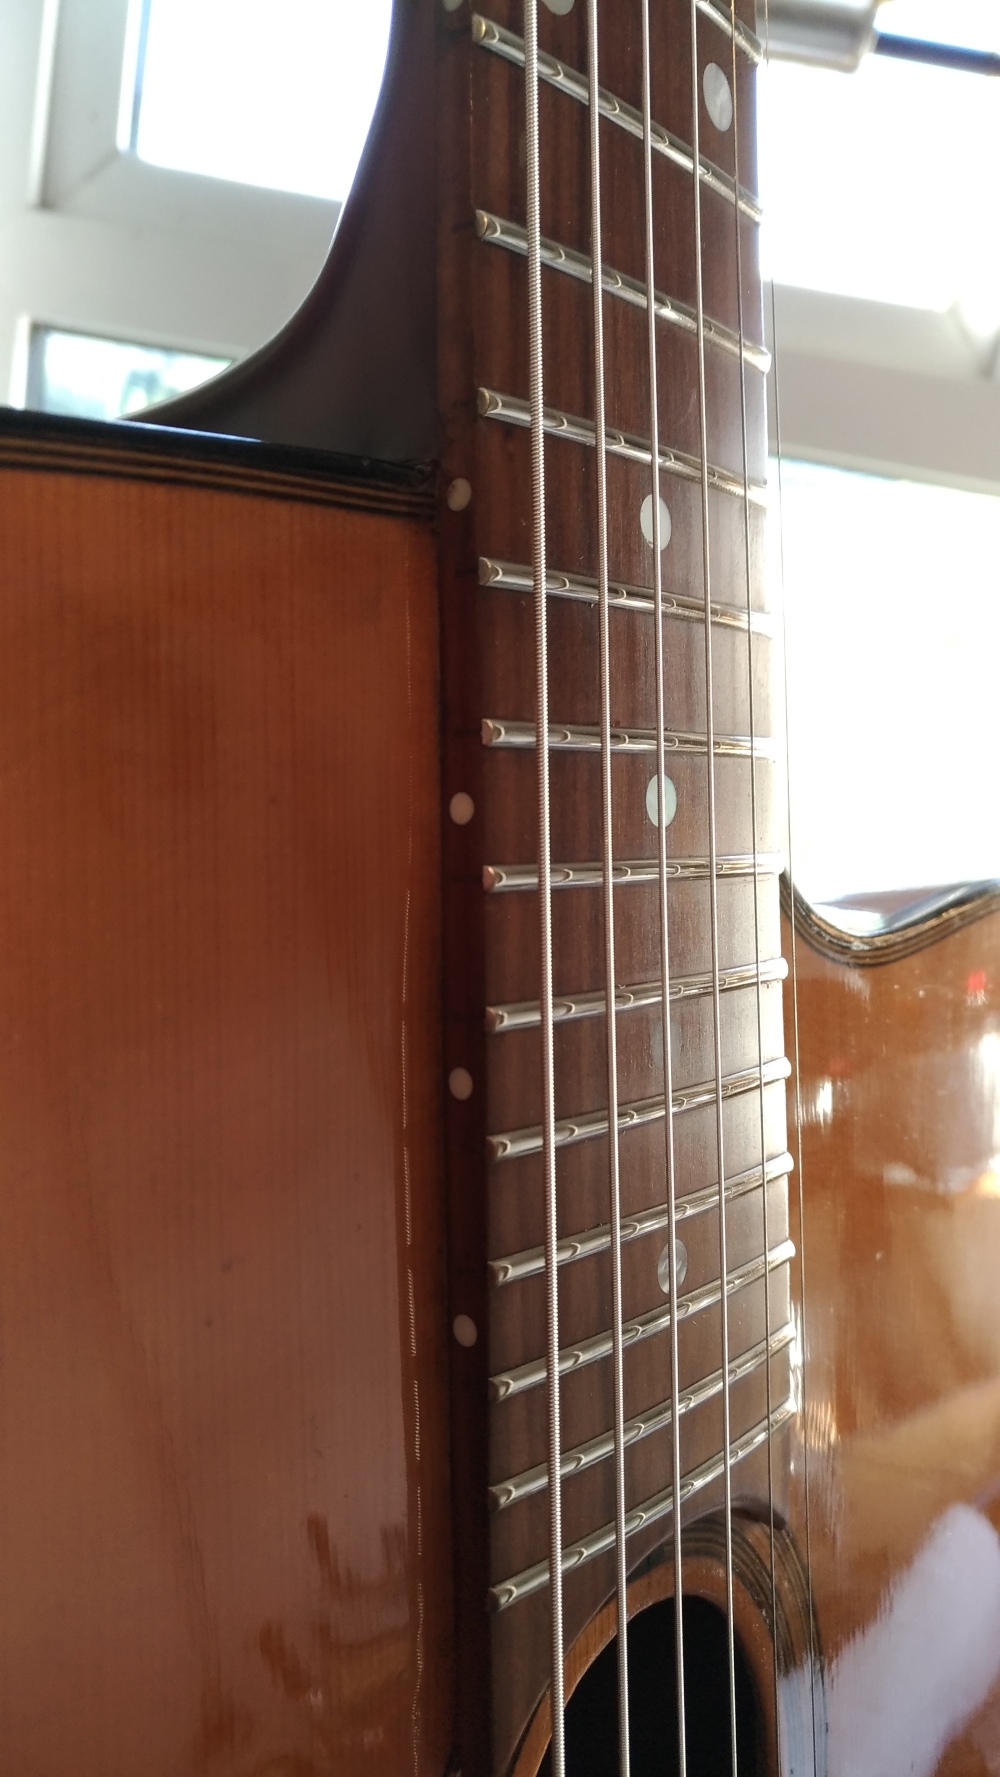
The 12″ radius for the fingerboard fits in with the clients other guitars.

The guitar came with absolute bottom end cheap tuners, not uncommon on craft made instruments. I fitted these as they look right, have an appropriate gearing (16:1 which is nice for the long scale) and feel good.
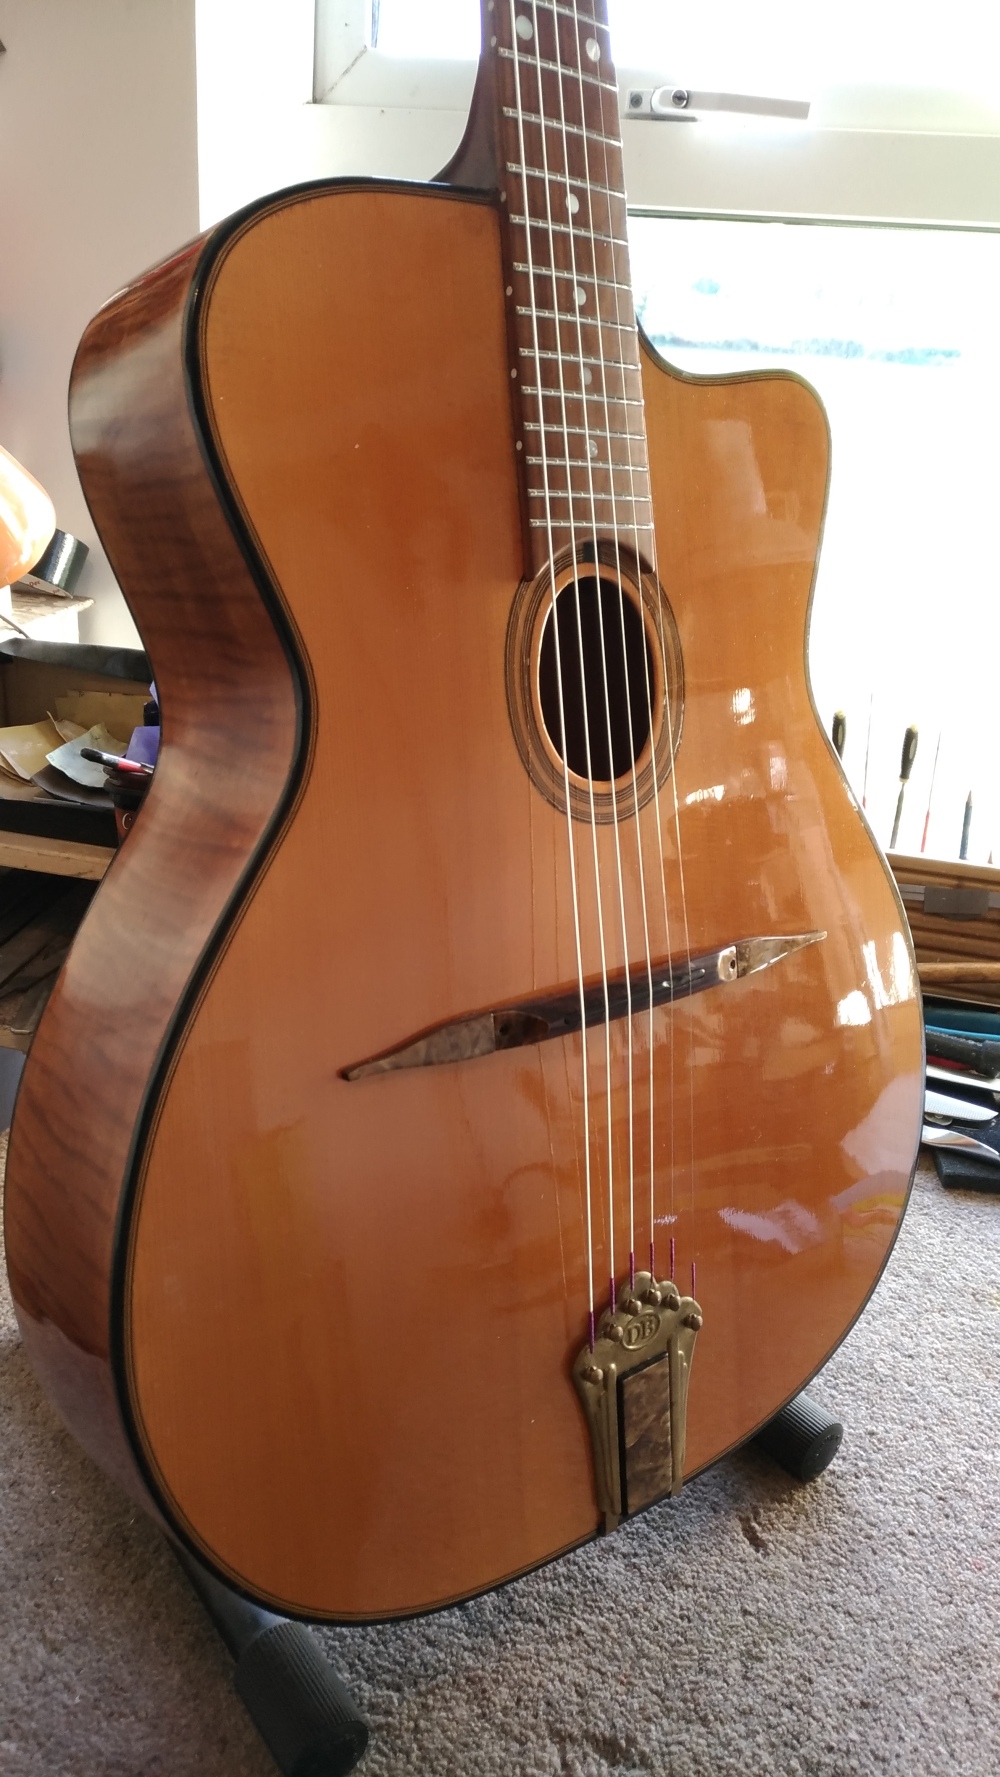
Finished. I built a new bridge and ‘moustaches’ which now incorporates a Highlander pickup system
Just to be different, the bridge flat surfaces and the tailpiece insert are the same veneer. The net result of all this work allowed a great guitar to emerge. Generally, these type of guitars are strong in mid range, top and volume but rarely have much bass. This one was surprisingly warm with noticeable bottom end.
Replacing a pin bridge on a Martin acoustic
A very talented young player called Brendan Maher, whom I have been fixing and modding for many years presented me with his newest Martin acoustic. Brendan plays somewhat in the style of Tommy Emmanuel requiring palm on bridge. This is what I made.
It’s Ebony with veneer covering and quick release slots in the bridge. They are a lot of extra work but make restringing very quick and easy. I’ve done this a couple of Brendan’s other guitars too, see below.
Fan fret bridge change
Here is another one of Brendan’s guitars that got the pinless conversion a while back. This one though was a challenge as I have no templates or tools to use with fan fretted instruments.
2x6mm Ebony boards glued together, profile shaped and tested for alignment.
This was the first of these I did for the client and felt the expanse of the odd geometrically shaped bridge to be unattractive in Ebony, even well polished wood. I would go on to decorate his other guitars in the same manner, the Martin bridge and the Gypsy acoustic above.
From the back, I love quick release bridges.
…and the front
Odd looking instrument but sounded good.
The other end of a fan fret neck. The nut was replaced as well as the truss rod cover.
Godin Multiac with broken headstock
In over 30 years of doing this, I think this is the first slot headed guitar I’ve seen with a broken headstock. These Multiac Godin’s are rare instruments usually prized by their owners.
The repair presented no difficulties but making it look nice did.

My solution was a maple veneer under a Burr Walnut veneer with the sides bevelled to show all three timbers. I think it works and the owner was super pleased. A company in the UK I use for decals (Rothko & Frost) made this one off brand logo for the headstock.
Broken headstock 1970s Guild acoustic
1970’s Guild acoustic with badly broken headstock. This came in to me a couple of years ago and it quickly became apparent it had suffered multiple breaks with ineffective repairs in the past. To be fair to the previous repairers, the design is seriously flawed and that area of the neck is weak to start with.
Once I was able to remove the fingerboard I realised there was a crack all the way down the neck.

Fingerboard and truss rod removed, the headstock then just fell off.

The first job was to glue the parts back together. Then the truss rod adjustment cutout was filled with a fillet of wood and 3 Carbon Fiber bars were routed and installed across the weak point. Fingerboard refitted and then after 48 hours, some pressure testing with no ill effects.
There was so much damage to the back of the neck along with the many unsightly fracture repairs the only way I could present it nicely was a very dark stain on the back of the neck.
On the front a low gloss lacquer was used and some masking spray work as well as the original, now dummy, truss rod cover to hide the damage. Those Schaller tuners are quite heavy too which would have made the neck vulnerable as well but they are original and work well so on they stay.
Upgrading a cheap travel guitar
This is a Harley Benton (Thomann brand) €99 guitar and was bought with a purpose. I had been asked if it was possible or worthwhile in getting such an instrument and upgrading it. It has a short scale so the standard tuners were way too fast for accurate tuning. The instrument was well made and certainly excellent value for the money so I had a good foundation. The frets were levelled, crowned and polished. A bone nut, saddle and bone bridge pins were all added.

The brand logo was removed by request inside as well as on the headstock.
I found a set of vintage style tuners running 20:1 ratio that works perfectly on this size of guitar. The end result increased the original price by over 250% but it is a cracking little guitar that sounds grand but plays like a much more expensive instrument.

And the cleaned up bridge with bone saddle and pins.
1950’s James T Coppock Antoria restoration
This came in for a few minor matters like 1:1 geared tuners that frankly, didn’t tune and were impossible to operate and largely mended by amateurs over the years. The action was very high as well. It turned out the guitar had been used left handed causing wear to the soundboard. You can see where I recovered it as best as possible within the budget, on the left of the soundhole (slightly darker).

Further examination revealed worn out frets and several major cracks down either side of the neck as well as beside the tail piece. Once those repairs were complete I set to removing the frets only to discover the ‘fingerboard’ was actually a 0.5mm black dyed veneer that came out with the frets. I made the thinnest Ebony fingerboard I’ve ever made (1.5mm in the center) while adding a 14″ radius to the previous flat board. Once the new board was finished and fretted as well as the top being lowered, you can see a reasonable action was achieved (3mm at the 12th on the E6, 2mm at E1). The metal bridge also had to be manually bent/radiused for the new fingerboard. A flat board is most uncomfortable with steel strings for the majority of players.
Initial multi crack fixing, many more were discovered as I proceeded. Not uncommon on vintage restorations.
Fretboard, a la James Coppock but it’s entirely possible the maker was working from a set of plans. Some investigation shows that the company made a range of products and that it is unlikely the people who put this guitar together were actually luthiers, or perhaps just under time/profit pressure.

A closer view of the recovered headstock complete with original retail sticker. New tuners and bone nut.
Back view. These were the only tuners I could fit on the very narrow headstock, they work well.

A close view of the adjustable bridge and poorly made tailpiece. The budget did not extend to sorting this out and while it feels incomplete to me, it does give the guitar a look of originality and the owner is happy enough. The general idea with these restorations is to follow the customers instructions, but make them look cleaner and play by modern standards.
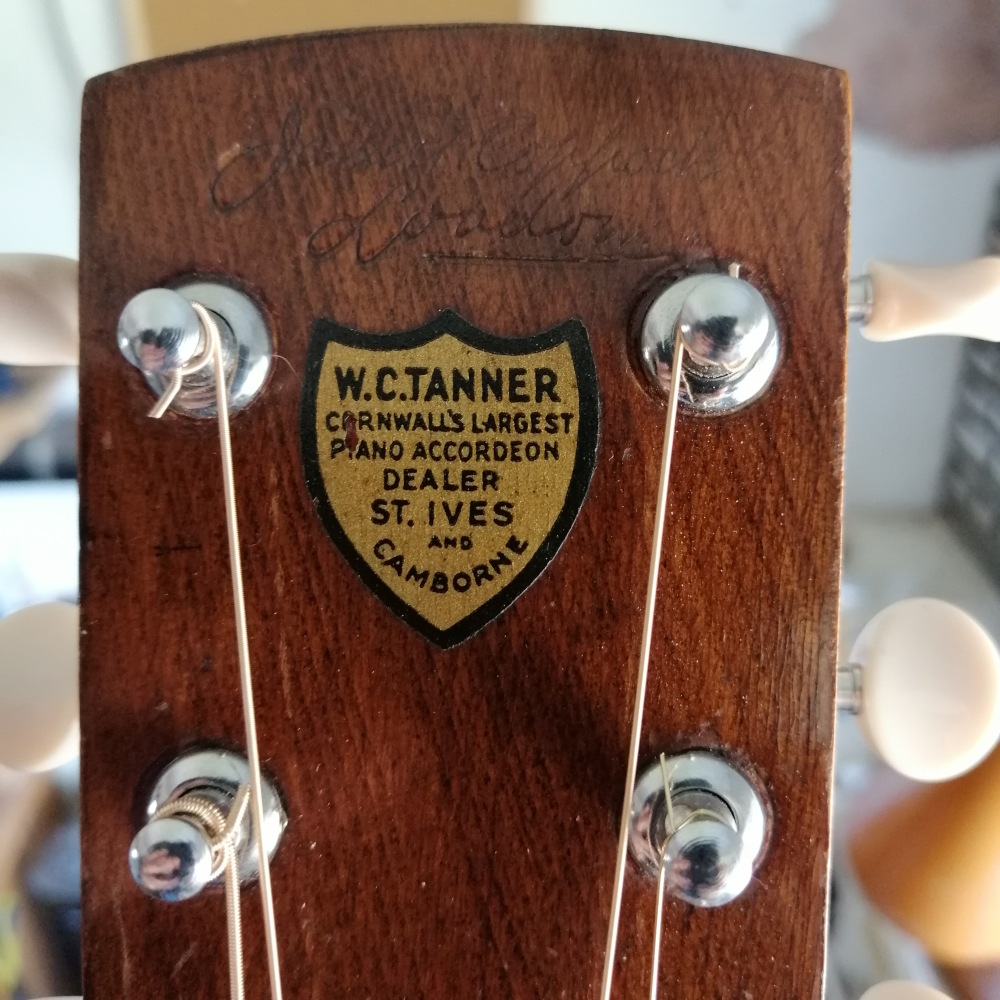
Close up of makers brand and retailers sticker.
The left side of the neck has quite an inward curve from the 2nd fret to the body. I was unaware of this till stringing up time and the nut had to be adjusted to allow the E6 to stay on the fingerboard. This is why the dot markers (in the original positions) appear too far to the left, they are actually in the center measured at the nut and soundhole.
1970’s Suzuki Dreadnought

This came in last year in the inevitable condition that old acoustics left in attics etc. The action was in double bass territory and completely unplayable. The top was straightened and underneath all the crud, the bridge timber was ok. As was common to the era, it had an awful height adjustable bridge that just kills the tone so out that went for a new wide bone saddle.
This was owned by the customers late mother and was being done as a tribute to her, as can be seen. I use a very good company in the UK, Rothko and Frost, who made up the memorium logo as well as the hand drawn Suzuki one. While this is not strictly accurate for the era and that there were quite a few Suzuki family makers, this in my opinion, looked the best.

Finished. With the headstock lacquer polished (I used a slightly duller gloss as full shiny lacquer would not be appropriate) and with the hardware installed, it all looks nice.
The customer chose these butterbean knobbed Grovers in gold and they fit right in as well as being remarkably smooth with a 22:1 ratio.
The original fingerboard was decent Rosewood and once the surface was planed true, it was stable enough to stay.
Vintage style gold MOP dot markers fit in too, as opposed to the brighter standard dot.
Close in of the recovered bridge. Bone nut, saddle and bridge pins. The top was also in surprisingly good condition once cleaned.
Compensated nuts

This is rather nice acoustic made by Laurent Brondel and owned by session supremo Tony Byrne. Tony has a sharp ear and the intonation inaccuracies many acoustics suffer from were an issue for him. This seems to have been the solution – “Equal Tempered Tuning”, a Compensated nut or sometimes referred to as the Buzz Feiten tuning system. In keeping with the high price tag of the guitar the entire nut was replaced and it appears to have solved these problems.
From the business end.
Another and somewhat drastic/dramatic looking compensated nut on an old National glass fiber bodied guitar from 1962. These instruments had a zero nut which is why the surface area of the whole thing is much greater. The owner has a very keen ear and plays in heavy drop tuning. That is a custom set of 10-60 strings. The guitar required new tuners as the original were no longer up to the job and a full refret as well.


This is another guitar owned by the same player and again, with a compensated nut, in bone. Note the difference in pattern between the acoustic at the top with a wound G string and the two electrics here that use a plain G. Rickenbacker also got a refret.
![P_20170802_170623_vHDR_Auto[1].jpg_snapshot_00.36_[2017.09.11_11.41.36]](https://tonythompsonguitars.files.wordpress.com/2017/02/p_20170802_170623_vhdr_auto1_snapshot_00-36_2017-09-11_11-41-36.jpg?w=1000)
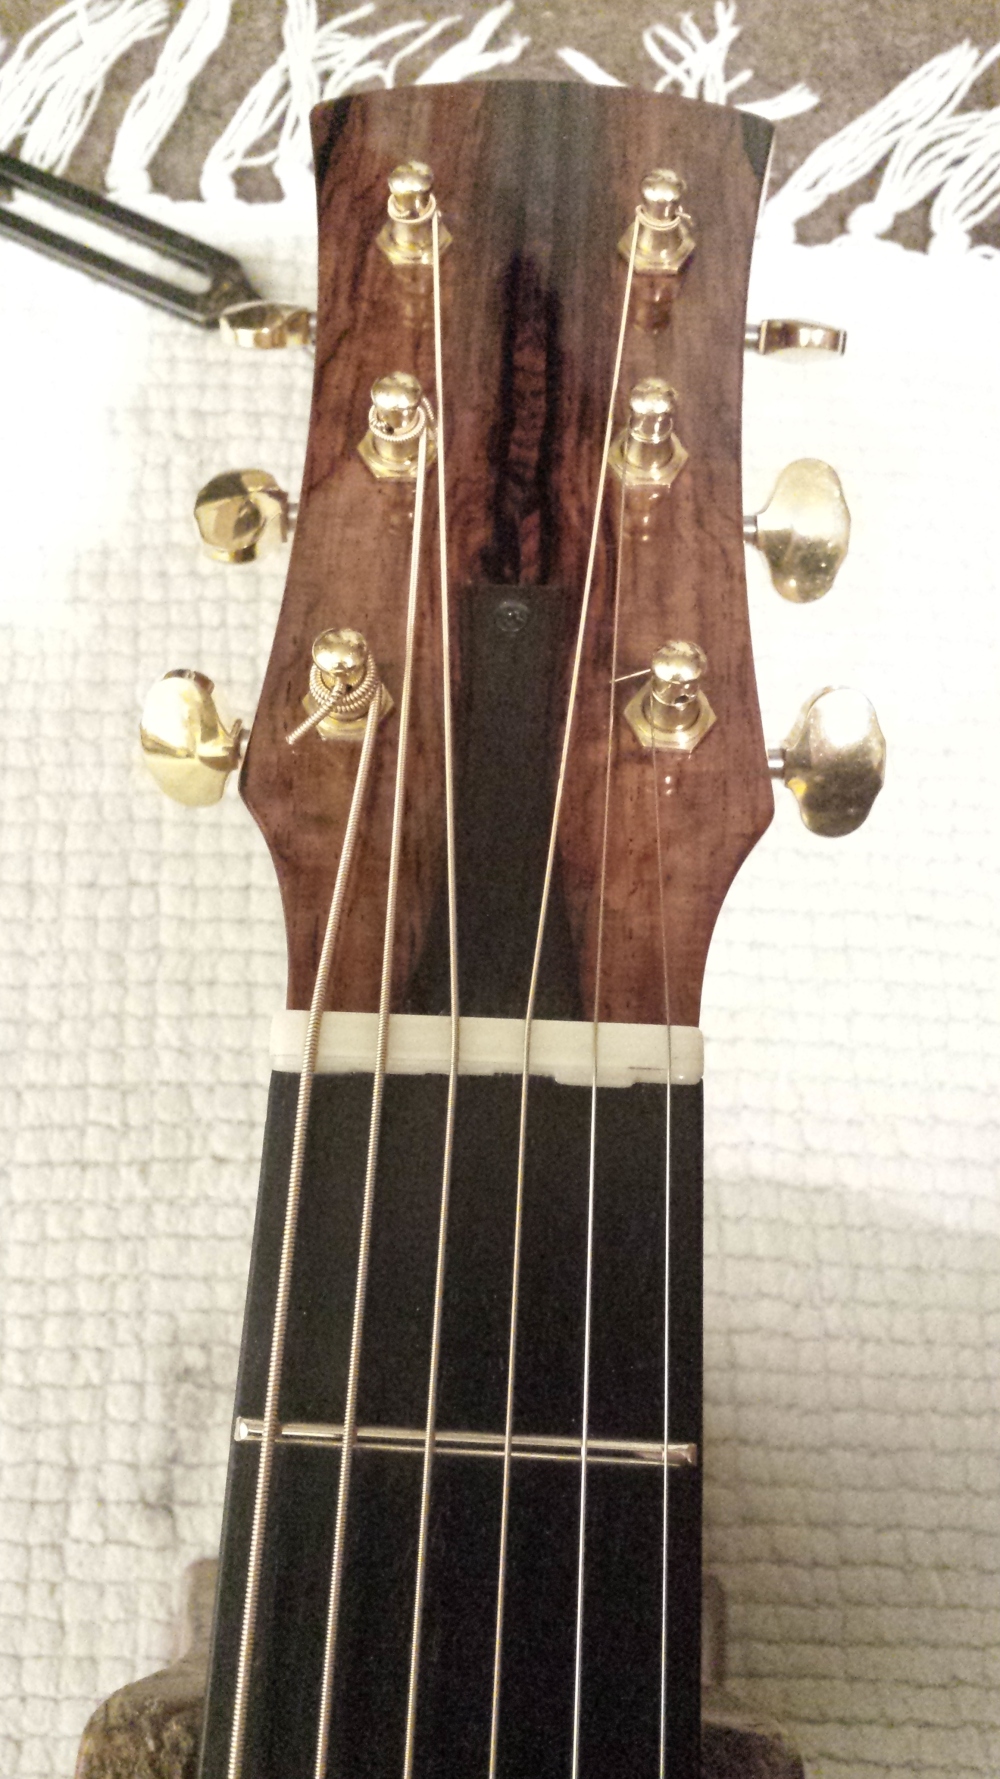
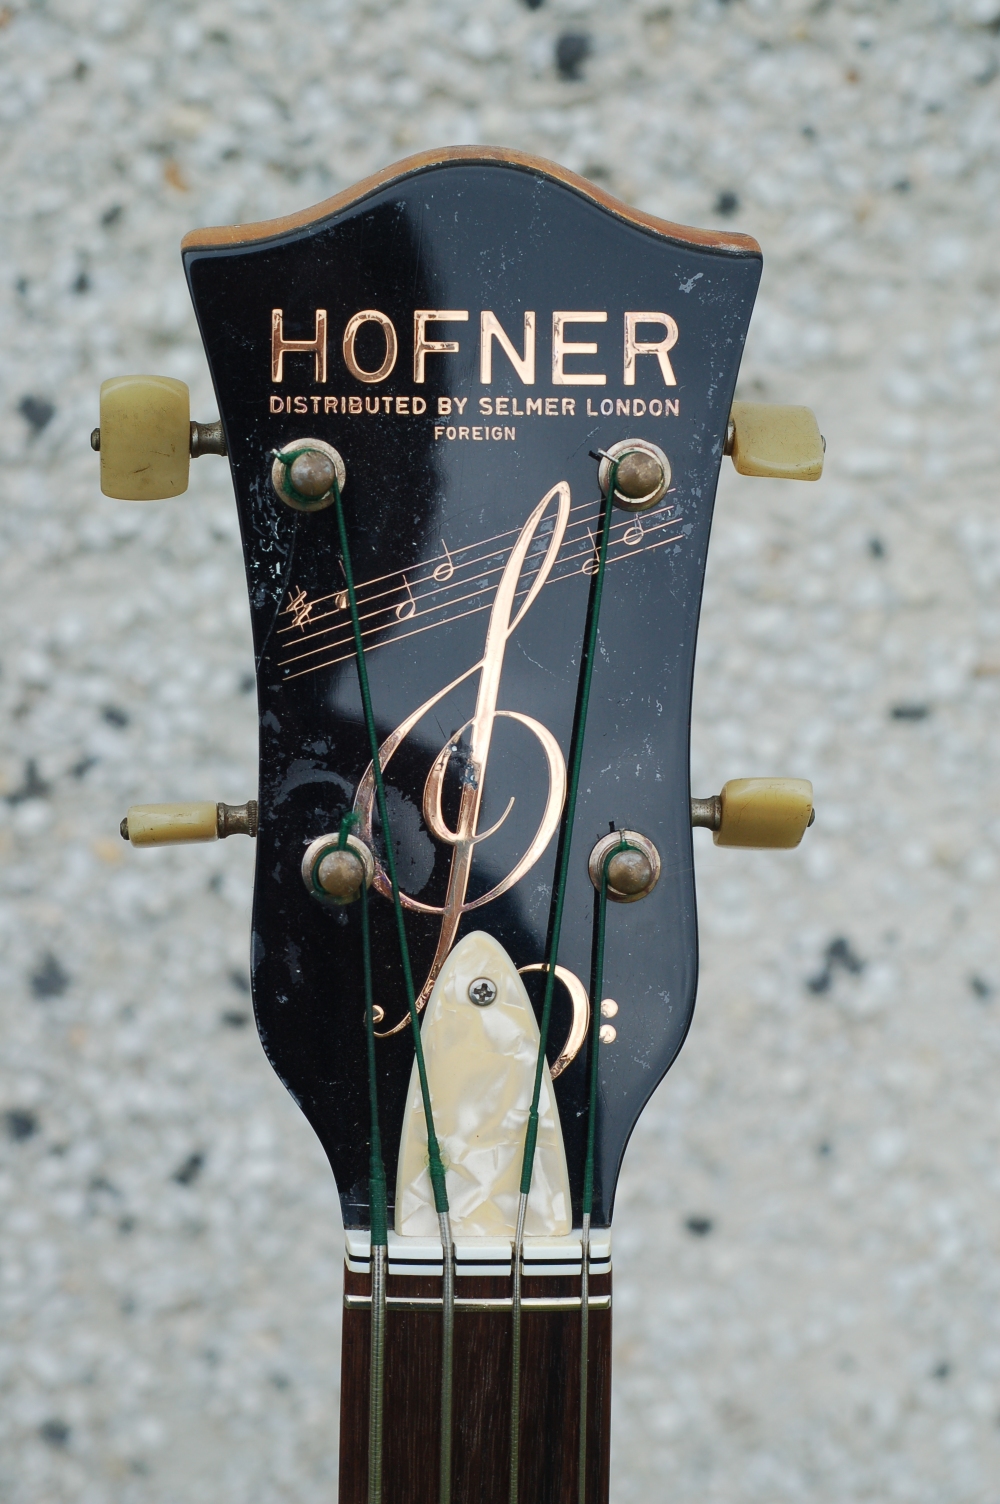
Old Hofner President bass
Although this is in the repairs and projects section I have it so because this one took a good while to complete. The neck was warped and the fretting beyond retrieval so out they came, I skimmed the board and put new ones in. The originals were a bit inaccurate in their spacing too so a good few slots had to be filled and recut. Originally these basses came with monster frets for some unknown reason but I refretted with a smaller lower profile part. The laminated nut was broken beyond repair so I made up the necessary width of acetate and it looks about right. Although the tuners were rough looking and I did buy a replacement set, I was able to straighten and rebuild them so as they work remarkably well. Those strings are Pyramid Gold, especially for the Hofners. They were expensive and absolutely dreadful, the string to string balance was way out and the the E was as dull a ditch water while the G was so bright and scratchy it was unuseable. Off they came and I shortened and adapted a set of D’Addario 40s. Perfect and nice tone too.


The pickup was unretrievable so I got a new one from Hofner. The control plate was missing so I made some “sparkly’ acetate about right for the year and it looks ok I think although the matching truss rod cover I made may have been just a shade tacky. The tailpiece needed a good cleaning and the original bridge needed substantial repair but as this is not the same as the one use on the violin bass, a replacement was not available anyway. Adjusters were adapted and new fret pieces for the saddles installed along with a pair of ancient Hofner knobs I’ve had for years in my spares box. As far as I know, his model didn’t originally come with any switching because there was only one pickup, later models had two but these single pickup types are quite rare.
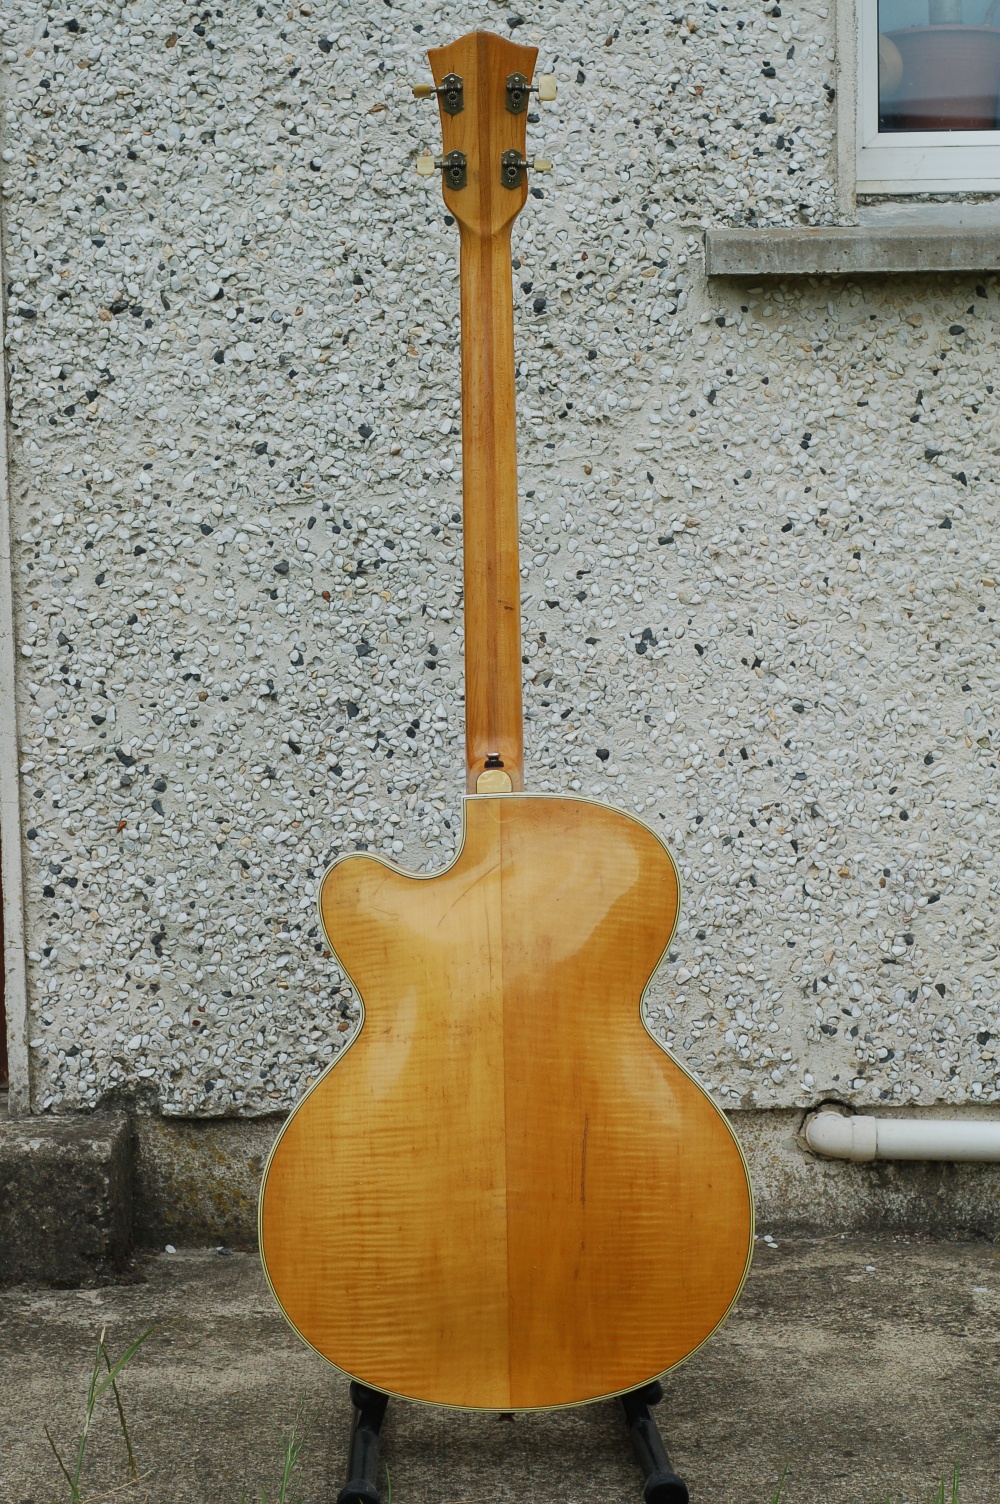
Finish came up nicely with very little damage showing. Headstock condition was very surprising.
Violins too

Every now and then a violin comes in to me for repair. I live about 15 miles from one of what may be the top violin makers anywhere, (Conor Russell, Kilbride, Co. Wicklow) who is a pal of mine, but this is work that would have to likely join his long waiting list and I doubt the owner could afford the cost. Most of the seams were failing and in the past some poor repairs had been done but now the neck was out and the fingerboard about to leave as well. Along with a good few cracks on the top I got it all sorted and tidied up the finish. It is a craftsman made instrument of some vintage but made with quality materials and while I was tidying the back I came across a tiny engraving in the edge of the back plate with the makers name and an early 19th century date so yes, about 180 years old and judging by the way it was made, I’d accept that.
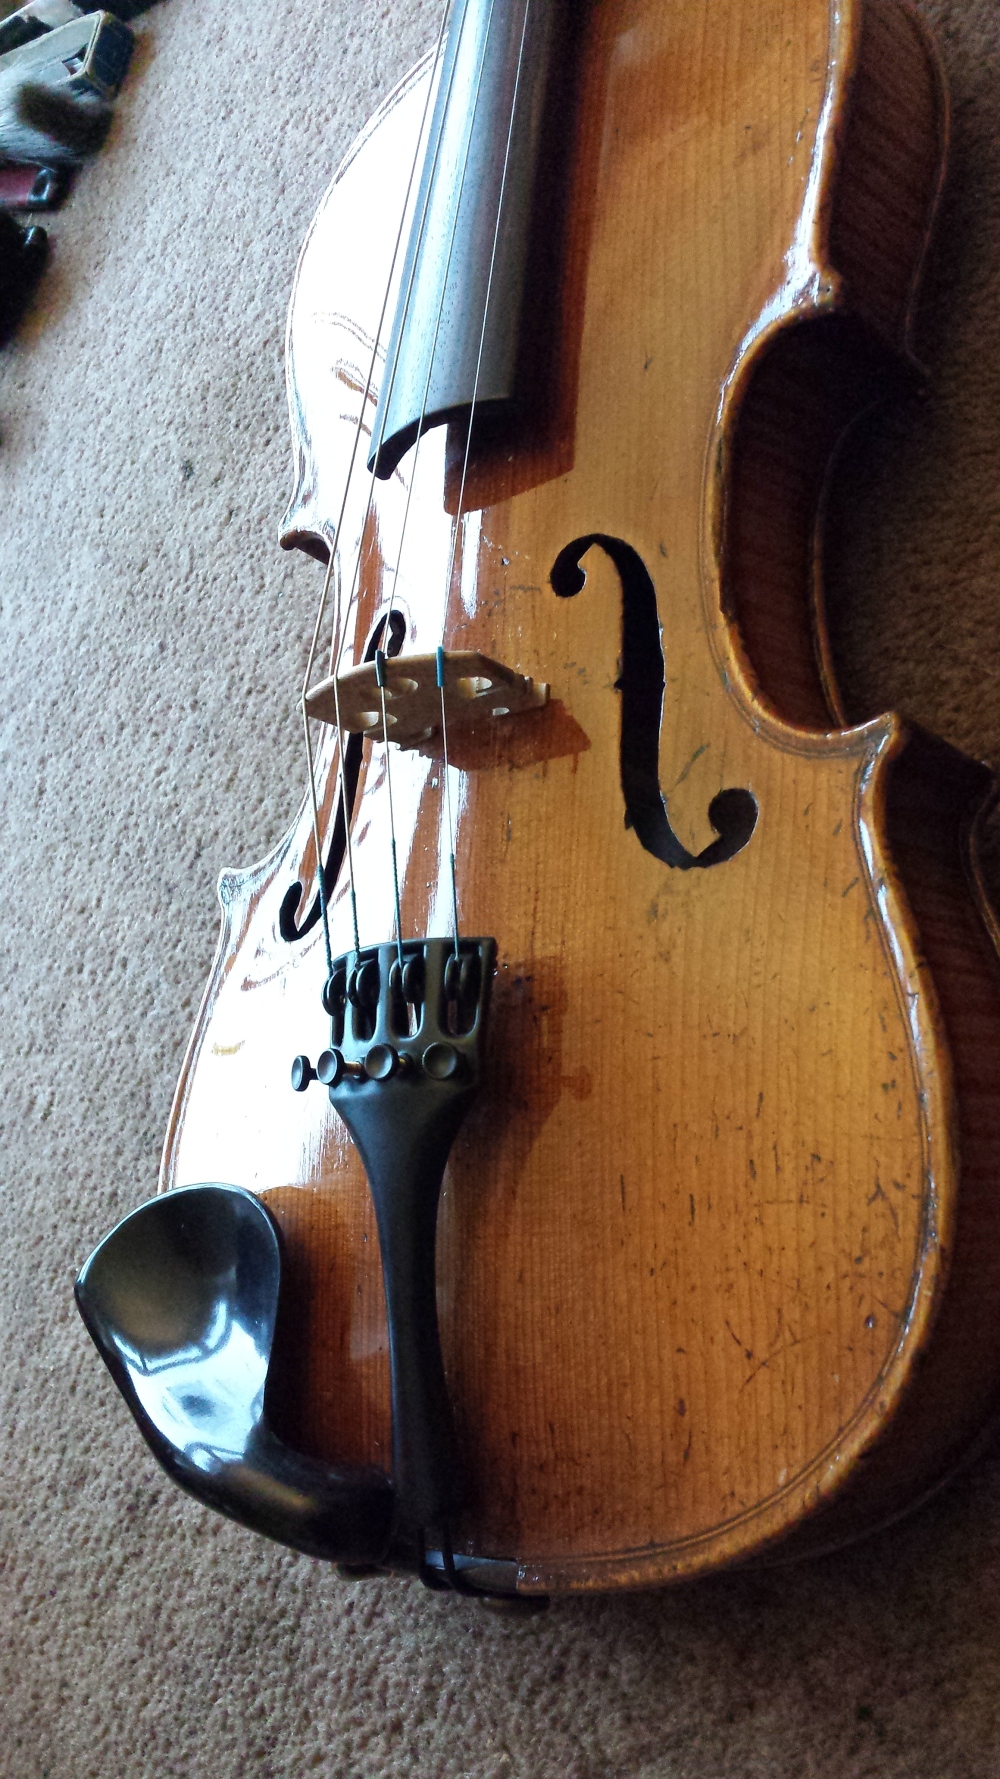

Rather pretty and apparently plays and sounds nice too. Tailpiece and chin rest are obviously not original but the bridge was pretty old and hand made so, ……
Mandolin bridge

An Ovation Mandolin that came in with a split bridge with a chunk missing. By the time I had it all repaired it wasn’t so pretty so I added this veneer. I think it looks appropriate.
Six string bass bridge

A close up of the new Macassar Ebony bridge I made for the 6 string bass in the bass gallery. The strings run completely over timber, no metal or plastic from nut to bridge. The anchor piece is also Macassar Ebony but it’s got a Tru Oil finish.
Parker guitars and refretting

If you own a Parker guitar and one of the bizarre tangless frets comes off, there are very few people who can help you, Parker Guitars least of all. You can call, email, fax or whatever you like without any response.
To understand what I’m talking about one must understand that a normal fret is a “T” shaped device where the lower stem or tang, goes into a slot in the fingerboard and the top of the T has a dome shape of varying size and shape that sits flush on the fingerboard. The Parker fret has no tang, is made of stainless steel and is glued on using a jig directly on to the carbon fibre fretboard. This means if you knock one off the chances of refitting it correctly are almost nil.
This top of the range Nitefly was bought to me with several frets missing about six years ago with a very distraught owner who had a great love of the instrument. Someone else had already had a go at gluing the frets on, and this is the correct glue but the location was out and they were uneven and so unuseable. After a lot of examination and attempts to contact Parker with no effect I set about solving this dilemma. There was more wrong as well, several of the piezos in the bridge were not working and the bridge pivot bearing (yes, caged roller ball bearing races) were rusted and seized. There were other issues in the end but once I had an answer as to how to fix it, the owner decided to go all out and replace the pickups as well as getting it refinished, an unavoidable part of how I would fix the fretting problem.
I made a 1.5mm Ebony fingerboard that was radiused on the top and bottom to fit on the Parkers CF FB.

From the headstock end.

I left the peg head alone as it wasn’t too badly damaged Unfortunately, I lost the remaining photos at the completion, suffice to say that because of the radiused edges of the Parker neck and because Carbon Fiber is unworkable without specialist diamond tipped tools, I had to fill the tiny gap where the new FB met the radiused edge of the neck. Because the Nitefly has an absurdly thin neck (19mm av) The new FB only bought it up to under 21mm average so it was similar to the owners Strat. The Nitefly has a Poplar core which is a very light timber, with a CF skin around it. The neck is a hollow CF affair with virtually no heel to speak of and the whole instrument is absurdly light even with all the hardware attached. After consultation I installed a set of Seymour Duncan humbuckers to replace the factory DiMarzios, the OEM parts being a rather cheap selection for such an expensive instrument, in my view.
Once the fretting was finished the whole thing was painted in pearlescent aged white and I am annoyed I’ve lost those photos because it was quite the looker. The owner was sufficiently pleased to shed tears and even though the bill was substantial, I don’t think that was the cause.
So if you have one of these and the frets get knocked off, there are few folks who can fix this so careful where you go.

With a good portion of the electronics removed but showing the Fishman piezo buffer and preamp/mixer

Seized bridge angle adjuster

Ready for the new FB to be glued on. Note the lack of fret slots on the carbon fiber fingerboard although the vague lines you can see were either guides for me or where I attempted to cut a slot, unsuccessfully.
5 string acoustic bass, for me

I’ll start this one with the finished product because I did this in my spare time over about nine months. It was built largely using reclaimed parts and materials I already had except for the donor which was a Harley Benton 5 string acoustic. For this type of project a good quality acoustic is not needed and the real cost is actually in the time it would have taken as a contiguous job. Many of the parts are hand made, string anchor, bridge, pickup mount etc as this was entirely custom made.

The first order of business was to remove the neck which on most low end acoustics is held in with epoxy glue, very hard to separate. The white streaks are the run off from the Acetone solvent I used to soften the adhesive and the picture also shows replacement braces being glued in place to compensate for the large access hole in the back. Why this was necessary will be explained later.
The removed neck and body together. I have cut the sides off the HB headstock and glued on some Pine laths with 0.6mm black Sycamore veneer between for decoration. The bridge is also gone because this will have a bridge and tailpiece setup. The HB 5 string acoustic bass is actually pretty good value for money as a bass for someone who doesn’t want to spend a whole lot, maybe as an extra. There are other options, the Music Store Jack&Danny range are well worth considering as an alternative. Out of the box it would need attention and it, like nearly all acoustic basses, will not compete with anything other than the quietest instruments unplugged, they are designed to be plugged in. The factory pickup and preamp is quite comprehensive and for beginners it should suffice but for me, it all went in the bin. I have my own piezo based system.

Having carved the basic shape of the peg head I installed a 0.6mm Maple veneer followed by a 1.5mm Ebony veneer and a 0.6mm Madrone veneer on the front to finish it off.
The neck with fingerboard removed and extra channels cut to take graphite bars. This neck would be a lot slimmer than the chunky factory item and I used graphite for reinforcement. It’s an interesting material. If you cut a piece of wood out and make a graphite bar the same size and then apply bending strain to both, the wood will bend and snap quickly as will most non metallic materials. The graphite won’t flex that much and substantial pressure can be applied, maybe 15-20x the force of the breaking strain of the timber before it gives in, carbon fiber will go a good bit further but brings a whole set of other issues to the table. The real bonuses are yet to come though, graphite is extremely light and once epoxied correctly into the slots, there will be very little flex in the neck and in many cases, no dead spots either. The final integrity will come from gluing on the fingerboard, the truss rods load is massively reduced and it is almost relegated to a control and support device. I’m using a 2 way rod because A, I like them and B, I use very low tension strings but need to have the options if I use something heavier. With the strings I am using currently the load on the truss rod adjuster varies between +60 deg and -45 degrees of movement at concert pitch.
Graphite bars installed.

This will not be an acoustic so the soundhole is filled in and so should be no feedback from the piezo either. Although I don’t have photos there is a 5″ wide block of wood, 1.5″ thick running from the tail to the neck block under the sound board. All the internal braces had to be removed to do this. Directly under the bridge this block is double to 3″ deep and that goes back to the tail. From the sound hole forward, that block is stacked through to the back of the body. Also, the HB has a very narrow 15mm spaced bridge and I wanted 19mm so if you look closely you can see the binding on the cutout side has been opened up and spread to accommodate the wider neck
I’ve had a few sheets of Myrtle veneer for years and this is what I decided to use on the top.
The neck with extra Mahogany grafted on to the sides was reinstalled but I added around +1.5 degrees angle, like an archtop because this will have a floating bridge. This pic shows the Ebony fingerboard, another reclaimed item, glued on and the pocket for the single Kent Armstrong pickup cut out. You can see in the cavity the body block under the soundboard. I also decided it might be nice to have the knobs partially recessed.

Another shot from the headstock end.
This is the bass getting ready for epoxy coating on the body top because Myrtle is not a flat veneer and I couldn’t use base coats to fill this discrepancy. Unfortunately for me, the person I bought the slow setting resin off told me it was for surface mounting/topping. This was not the case and after adding several thin layers I had to deal with small spider cracks appearing over the next few months.
These are the pickup surround and tailpiece, both faced in Madrone as I like to keep the theme.

The initial bridge I made was a bit too small so this is the revised unit. Made of Ebony with Madrone on top. The saddle is also Ebony and sitting on a Highlander transducer. That is mated up to a two channel adjustable level buffer preamp of my own design, the second channel being for the magnetic pickup. Post buffering the signal is sent to a D Audio 2 band shelving preamp. The Boxwood knobs topped with Madrone (that was a lot of work) control volume (with a pp switch to split the magnetic into the rear single coil) pan, treble and bass. More on the electronics at the bottom.
I was concerned initially that the B string would be a bit weak due to the way the bass is made, I was wrong. With the EQ set flat the notes on the low B are >95% of the same notes on the E string, the low B and C notes are totally there. Surprisingly, I ended up using mostly the piezo because it has a very level and balanced tone across the strings including the B, the magnetic is by nature, a little less precise but in the initial stages I thought the mag would be the primary and the piezo “ah sure I’ll put one in anyway”. My other bass is an acoustic 4 string fretless, heavily modified from the donor but it too has one of my piezo and buffer setups and the attack piezos give makes mags sound a bit soft in comparison but they sound well when blended.
After trying various types of string I got the best results from D’Addario 40-125 nickels. One thing I did miss though when placing the tailpiece, it’s about an inch too far back so the B and E have to be the super long scale strings, the rest are long scale. As this is my first foray into playing 5 string basses I wanted to keep the option to string it with a high C, hence the floating bridge because E to C would require the bridge to be moved forward 2mm on the treble side and 4mm for the low B however, after the usual tripping over myself and playing things one fifth down, I am comfortable with it now and so the low tuning will stay.
I did make a height adjuster for the bridge at one point but it removed too much of the low B presence so if it needs to be raised, I’ll shim the bridge base or saddle, although the Highlander pickups are super sensitive and don’t really take to the that too well, they sound streets above everything else though.
Close up of the multi laminate construction of the headstock with Hipshot Ultralights. That’s a tuner on the back of the headstock.


View down the side showing slim neck and reduction to the overall bulk of the heel and in the right pic, the large access plate on the back, lots of wiring in there. While some might feel my preamplification was overkill and that the natural sound might be suppressed by all that circuitry, I did take this into account. To test, I ran the mag direct, then through the D Audio and then, on its own through the buffer followed by the whole chain. The D Audio has a huge input impedance so nothing of the signal or level is lost, it just adds a slight hifi ‘sparkle’ to the the flat sound. The buffer amps have no ICs in them and draw minuscule amounts of power but also have a very large impedance on the input and more importantly, one must use a buffer on a piezo device anyway. The D Audio also has an output adjuster so I can balance everything up and also match output levels to any other instruments I use. My double bass has a similar buffer setup and all three basses are set at approximately the same level although in practice I use different channels live because the EQ requirements for the bigga fella and the BGs are totally different.
The whole thing runs on one 9V battery housed in the original HB battery output jack mount which I moved around to the back by the strap button location, which is only there for decoration now as I can’t play this standing up anyway.
This was made for me and it’s not for sale although I am in the process of making a 4 string with only a MM style pickup only and a fretted neck. The cost of making one of these is probably fairly high but if someones wallet was suitably filled and they really wanted one, I could do it. I made this because the group I play with all sit down, it’s Gypsy Jazz, and due to back problems, I am playing the double bass a lot less and thought this would be in keeping with everything.
Badly done wiring
This is something that has been bothering me mildly for a while and in view of a recent job, which I chose to catalogue, I’ve put this up as some may find it interesting and is an insight into some of the work I do. As said above, this is the latest of many of these type of jobs to come in but they are increasing in frequency. It concerns so called guitar repair men out there and their lack of knowledge, skill and competence as well as questionable morality in actually charging for the ‘work’ they claim they can do.
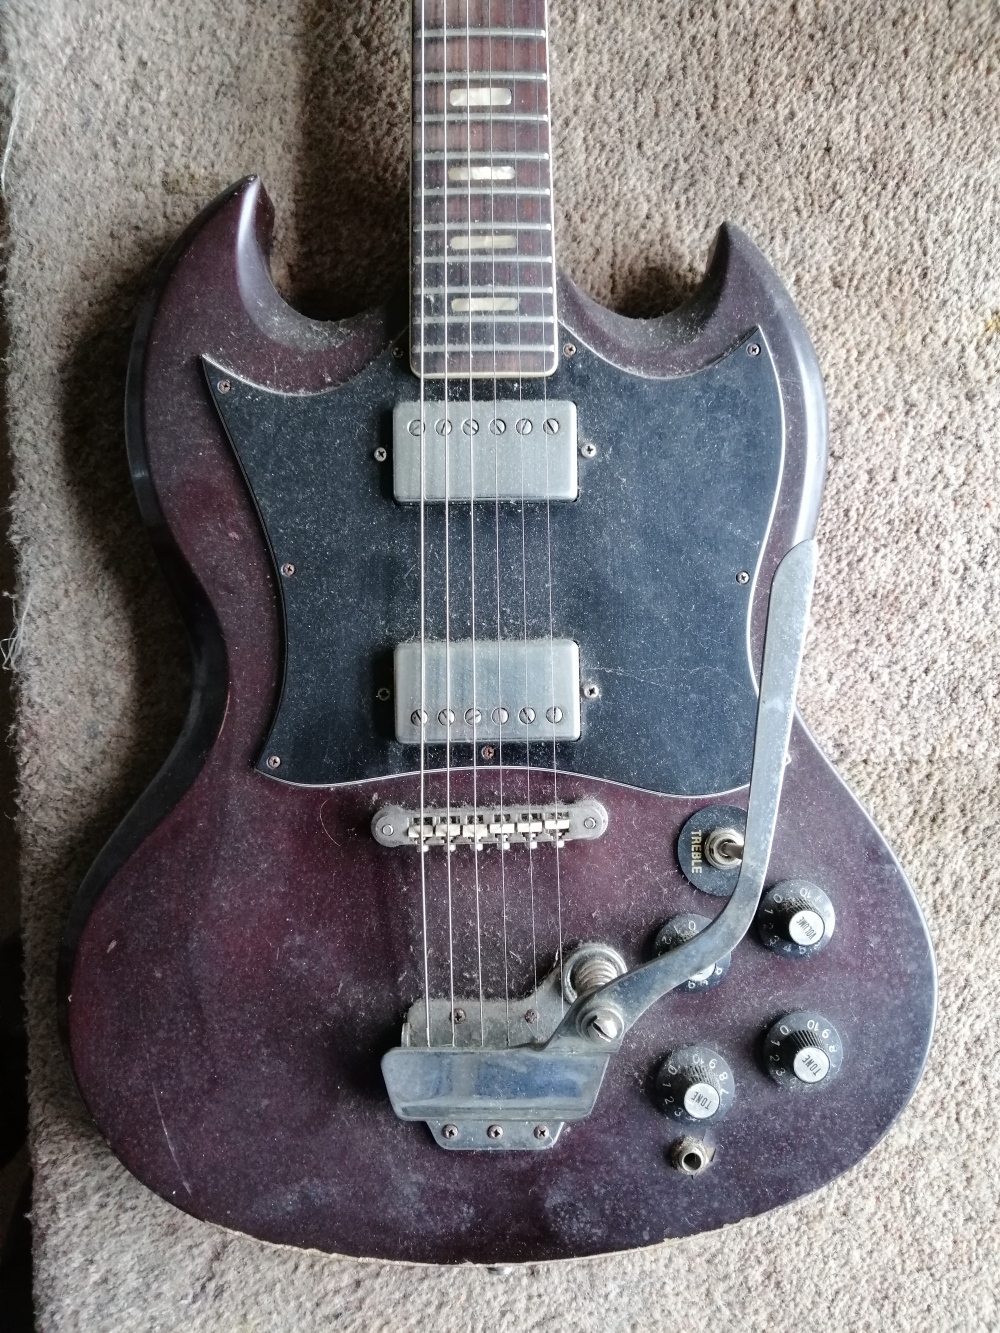
The subject is a somewhat rare original “Vintage” brand guitar from the John Hornby Skewes company, probably back in the 70’s before they became a byword for cheap tat. JHS was a major importer of guitars and accessories and is the reason for the “Salmon Pink” Fender Strats of the 1960’s. UK import colour schemes were limited to basic colours like red, black, white and sunburst and these were sprayed over the more flamboyant US paint jobs once they arrived on this side of the Atlantic, as many folks who stripped these back discovered. The paint used was a 2 pack Polyester and apparently, the catalyser was mixed incorrectly causing the red finish to go pink but only after it had cured for a few hours at which point, it was too costly to redo. As history shows, these were favoured by certain artists and later on, genuine originals became very valuable.
This instrument came to its owner as a gift passed down through family and apart from a chip out the side of the body, is in remarkable all original condition. Due to some electrical issues it was given to a local chap who claimed he could fix it. What he actually did was made a balls of it and most likely in order to bump his bill up, swapped in a set of second hand pickups (claiming the originals had both failed) and some absurd switching along with converting the Gibson style 2V2T setup to a single V & T, with vile and totally inappropriate knobs.
The pics show the birds nest of wiring as it was delivered back (and well done to the repairer for the single cable tie bundling it together), some of which isn’t even soldered but so much heat was applied to the pickup selector that the plastic chassis is melted in places although not rendering the unit inoperable. The pots were badly soldered and in my opinion burned beyond what is acceptable. Also, to accommodate modern short neck pots, some sloppy routing was performed in the control compartment. The OEM pickups were presented to the owner with the cables cut thereby likely ensuring he couldn’t verify that they were broken. Stripping them back and using a meter quickly showed they were fine. The replacement second hand pickups were an old Jackson and some other unbranded model, both with EMG style closed plastic covers, totally inappropriate visually for the type of guitar and not particularly good quality to start with.


The first 3 pics are the guitar when it arrived from front and the control compartment, the back cover being held on by 3 large chipboard screws. Next to them is where small toggle switches were put into the pot holes without washers even to support them. Moving on then to the prepped fully shielded control compartment, loaded with 4 new Alpha pots and then fully wired. I like using copper foil shielding as apart from the obvious it also means less soldering to the pot cases. Although the adhesive is strong and conductive where seams are joined, I like to solder them anyway in case of future adhesion failures, hence all the little solder dots. As you can see from that pic, the circuit is actually quite simple and doesn’t require vast amounts of superfluous cable. As it’s all in a fully shielded compartment, single conductor wiring is sufficient. And lastly, the restored SG copy from the very tidy headstock to the body, and full on.
Unfortunately, as shown in one photo, several frets have hammer damage and it may be for this reason that the action was set quite high by this ‘repair man’ (according to the owner), ending up more like an acoustic. In view of my taking pity on the fellow as he had already paid substantially to have this butchery done and his young age, I kept the actual bill quite a bit lower than it would have been. The only way to fix the fret problem properly is later on if he decides to get it refretted. Once the action was set correctly, the intonation reset and the pickups balanced it plays ok and while the pickups are not particularly high output, they have a decent tone. All in, it’s actually not bad and easily on a par with Fenders of the time if not quite as good as Gibsons but way ahead of most of the junk available then. The chip out of the body is fixable and again at a later date this can be tackled if the owner wishes.
Tread carefully folks and check your repair man out, impartially.
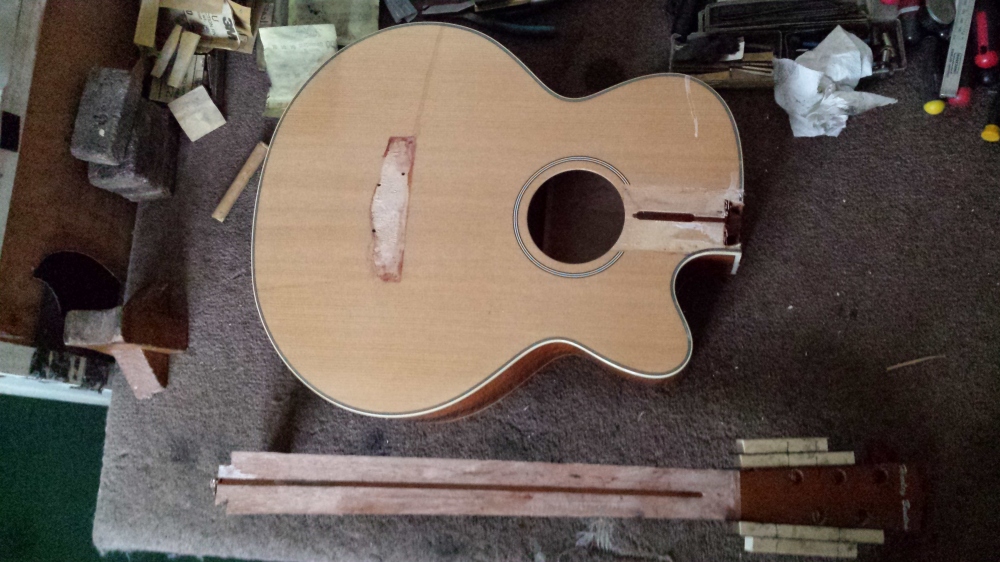
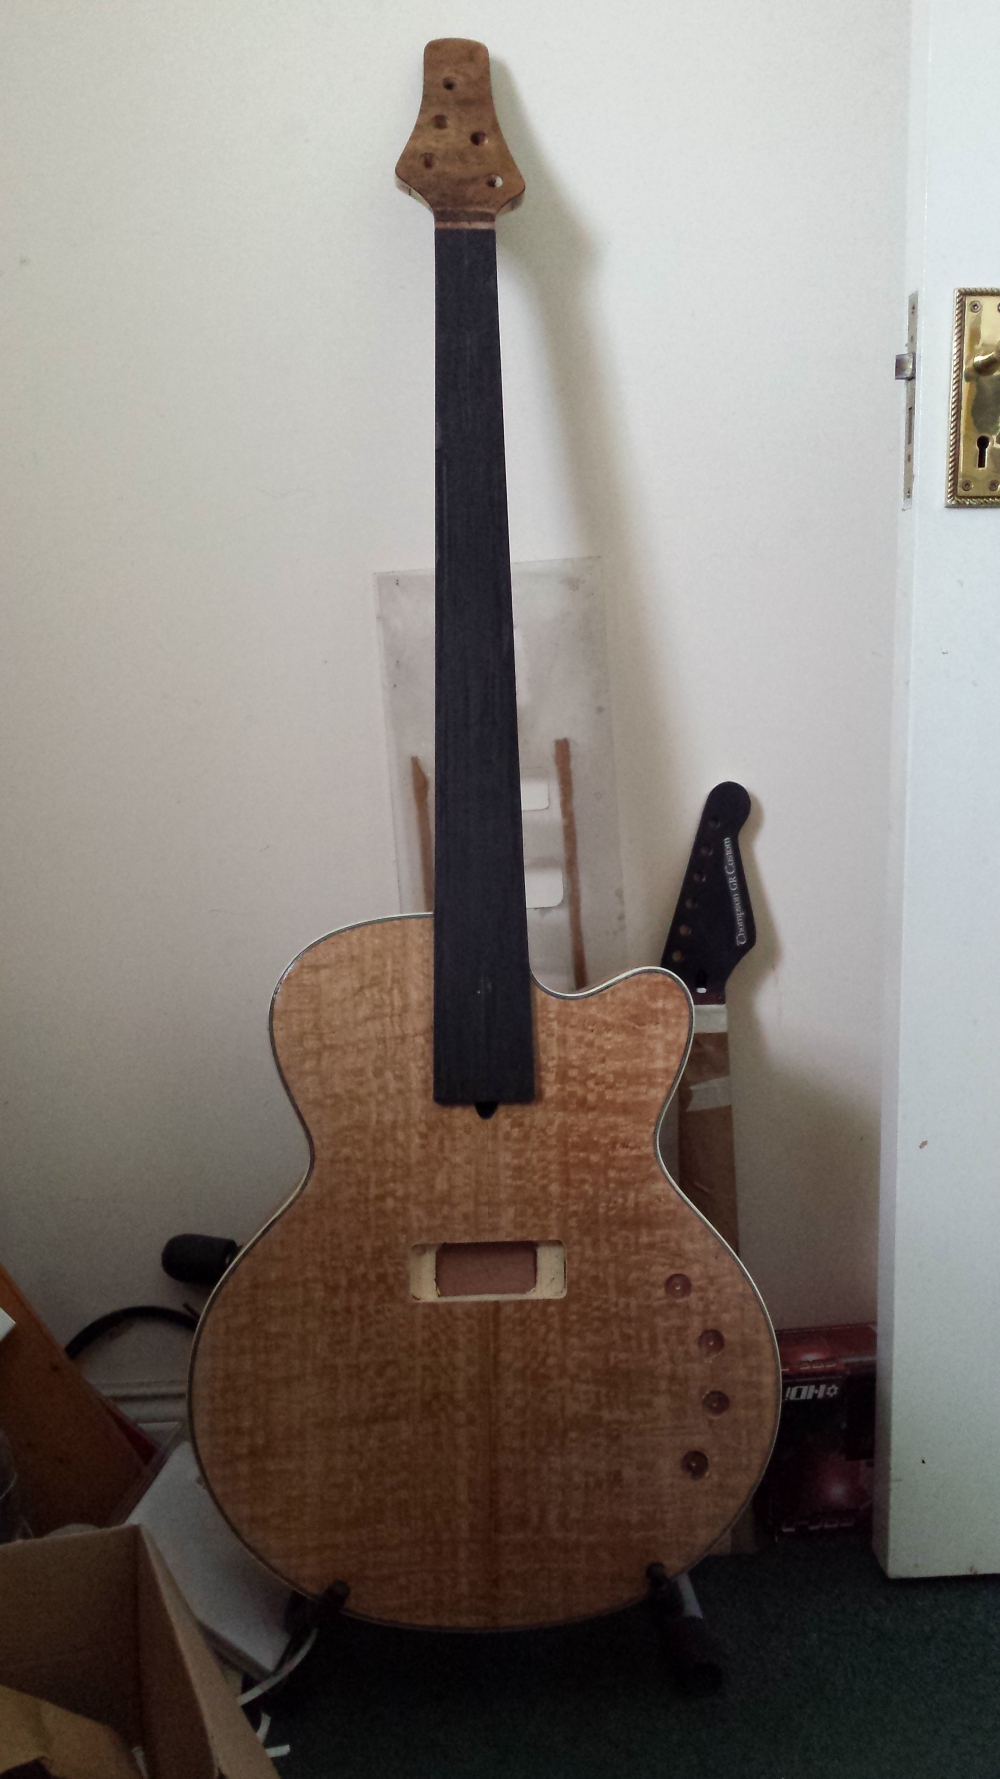
Thompson 4 string acoustic bass
Here is a current project I’ve been working on when I could find time. I have a 4 string acoustic already but it’s fretless and is currently strung with Thomastik nylon core strings and has a really unique sound. I also have the 5 string fretless shown further up the page with both magnetic and piezo pickups, running through my custom built mixer/buffer and D Audio 2 band preamp. That bass has 45-125 nickels and again, has a particular voice plus the low B which, much to my amazement for a semi hollow bodied bass, remains tight and useable right down to the low B. I have a fondness for the Musicman Stingray bass sound but I’m currently finished with solid bodied basses as I sit down mostly and visually, the apparent acoustic basses fit in nicely although the 5 isn’t acoustic at all.
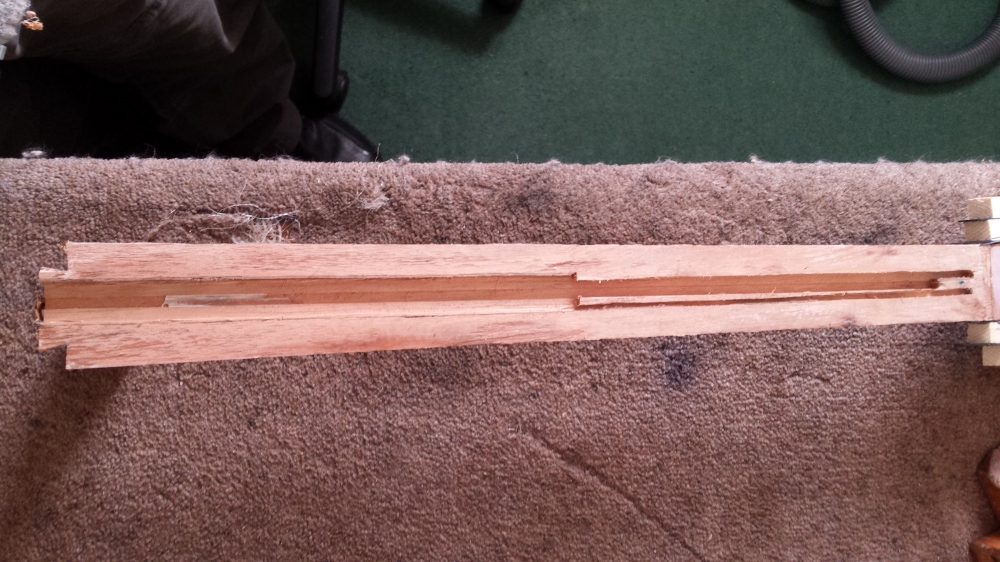
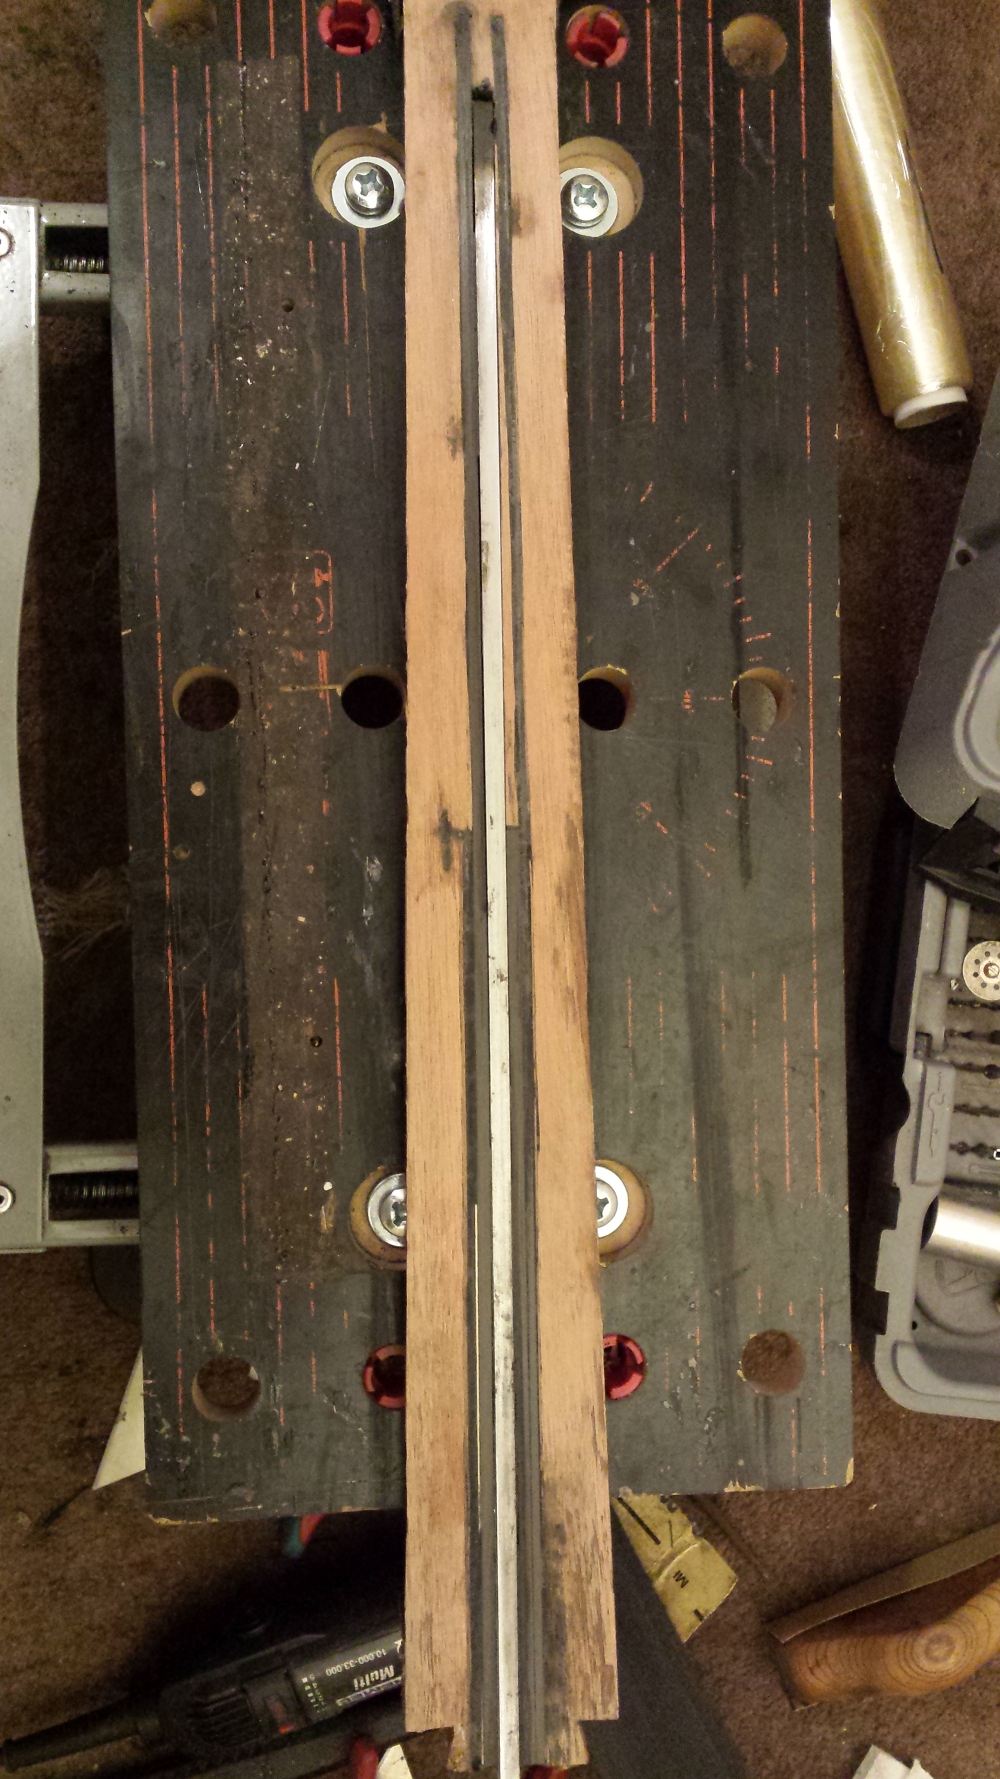
This bass is fretted unlike the other two, just for a different sound really. Like the 5 string it is not acoustic at all. The heel block is solid from front to back/top to bottom and there is a 100mm wide 40mm thick beam running from the heel to the tail and fixed under the top. Into this I have routed The pickup cavity for the MM pickup, the Warwick 3D bass bridge and sunk recesses for the three controls, V, T&B, there will be no piezos on this model. All the cutouts for the original preamp and jack/battery holder have been filled and a large hole cut in the back for access. This will be covered by a removable plate and will allow access to the electronics if needed. The inexpensive donor bass, all plywood as I don’t want or need any tone from it, was incorrectly listed as a 34″ scale but when I received it I discovered it was only 32″. Not to be unduly bothered, I am a luthier after all, I modified the neck and like the 5, added my own headstock which allowed me to pull it out to 34″. The neck was very thick Mahogany which doesn’t appeal to me so it had to be removed and rebuilt so as the final thickness including the fingerboard will be around 19mm at the 1st fret going to no more than 21mm at the heel, like the 5 string. In order to facilitate this I have again utilized graphite bars which are massively more rigid/strong than the piece of wood removed to accommodate them and also have the unusual benefit of removing flat spots but, they have to be fitted and glued correctly. Graphite will trash your tools if you cut or file it, it’s diamond tipped or nothing.
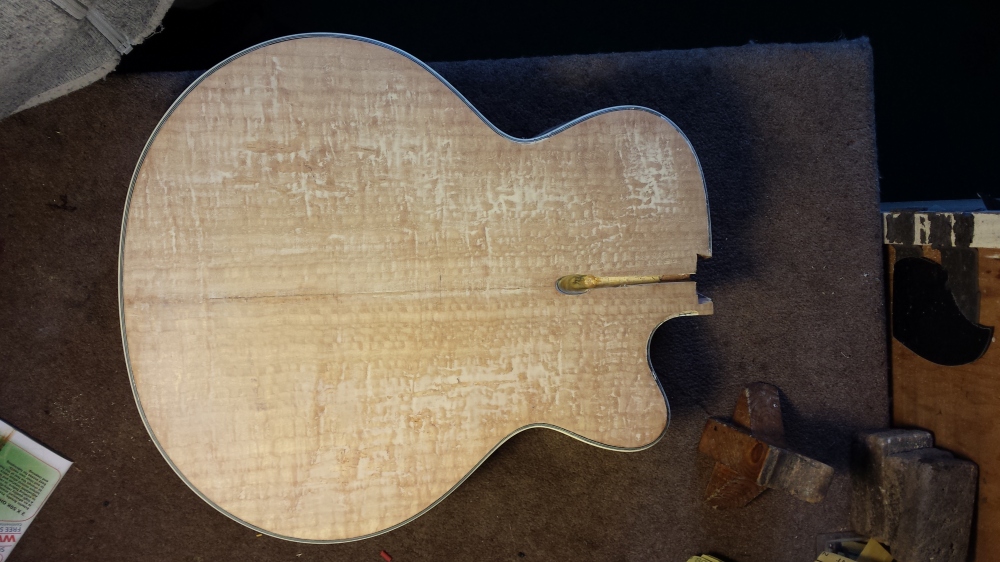
Once that was done I filled in the sound hole and applied an exotic veneer to the top. The contact adhesive I used was given to me by a pal who suggested it was the last word in such glues, but apparently not. After several months remedial attention trying to fix it I had to remove this veneer destroying it in the process. To make matters worse, once the original veneer was installed I glued the fingerboard in place and that had to be removed, damaging part of the neck as you can see in the first picture in order to work on the veneer.
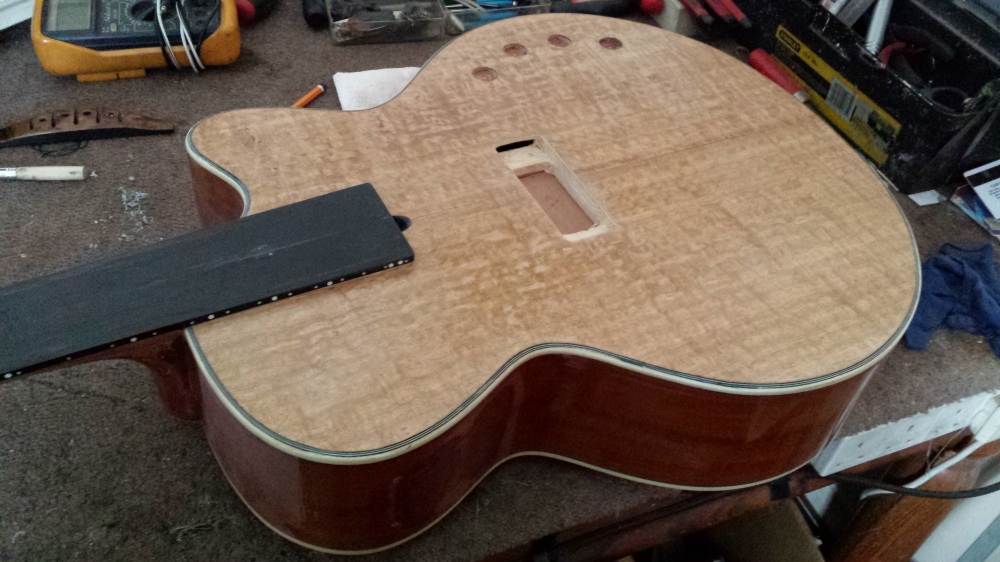
A search of the internet found some interesting looking veneers and I went for a much lighter setup this time. That’s Burr Poplar on the sides and I have no idea what the center section and headstock are called. This was applied using a very different gluing technique and has proven successful. On this bass I decided to do a fore arm cutaway which involved the binding at that point being lost so I had to custom make an 8″ 5 ply length and tint to match, it’ll look better once all is finished. The edges are radiused to allow the binding to contrast the Poplar, something I didn’t do on the 5 string. Because the Burr section of the Poplar tree is full of knots there were many holes to be filled and then sealed. Burr veneers or timbers can be tricky to work with as the grain can move more than 180 degrees within an inch or two and veneers will tear easily.
The fingerboard is a 20 fret salvaged Ebony FB from my parts box and now bound in Ivoroid. As the MM has rather larger than normal fingerboard dots (8mm as opposed to normally 6.35mm for many other instruments) I used 9mm MOP for the 3rd to 9th and then 8mm MOP for the rest to the body. On this bass it works but I’ve seen Fender basses with large dots and I’m not sure it looks good. The fingerboard has a zero nut, as I do with nearly all my own fretted basses, and an Ebony nut/guide. String spacing will be around the same as a J bass with 38mm nut width and around 19mm at the bridge. The saddle is made of Ebony and will be quick release.
I also tried some fiber optics for the side dot markers but my experience is not enough and I had to abandon the idea in the end.
Currently I haven’t had time to move any further forward but I’ll get there.
More to come…..

Veneer removed along with fingerboard. That’s the fiber optic cable channel on the right but it all to be rebuilt. You can see the graphite bars either side of the T rod which made the rebuild difficult.

Removing the veneer

Almost done and ready for surface prep.

New 3 piece veneers installed

Lots of Burr holes to be filled, looks like it’s diseased.

Top sealed, bevelled and levelled. New binding installed at fore arm chamfer.

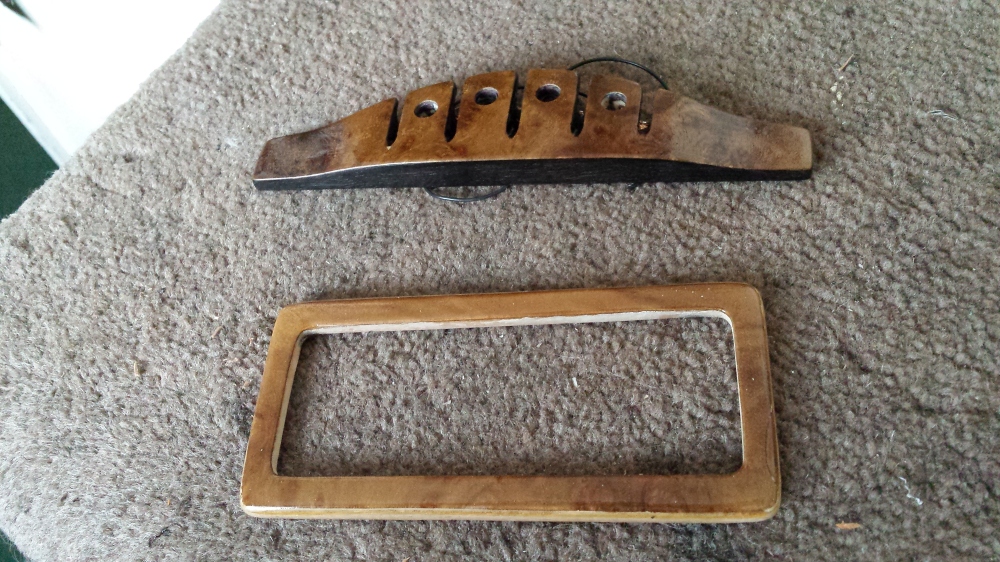
Mock up. Pickup surround, bridge surround and string retainer/saddle are custom made Ebony.

Fingerboard glued and big MOP dots installed

From the side. You can see where the original preamp was.

As it is currently. Fretted and awaiting spraying.

Headstock veneer matching central veneer on body.
